目录
- Server.StartAsync
- Server
- IHttpApplication
- HttpContextFactory
- HttpContext
- Configure
- IApplicationBuilder
- Use
- Run
- UseMiddleware
- UseWhen
- MapWhen
- Map
Server.StartAsync
在上节我们知道WebHost.StartAsync内部是调用Server.StartAsync的。
public async Task StartAsync<TContext>(IHttpApplication<TContext> application, CancellationToken cancellationToken){ async Task OnBind(ListenOptions endpoint) { var connectionHandler = new ConnectionHandler<TContext>(endpoint, ServiceContext, application); var transport = _transportFactory.Create(endpoint, connectionHandler); _transports.Add(transport); await transport.BindAsync().ConfigureAwait(false); } await AddressBinder.BindAsync(_serverAddresses, Options.ListenOptions, Trace, OnBind).ConfigureAwait(false);}参数application即为之前的new HostingApplication。在这里说下大概的流程:
KestrelServer.StartAsync -> new ConnectionHandler<TContext>().OnConnection -> new FrameConnection().StartRequestProcessing() -> new Frame<TContext>().ProcessRequestsAsync() -> _application.CreateContext(this) && _application.ProcessRequestAsync(context)如果你需要更细节的流程,可参考如下:
LibuvTransportFactory -> LibuvTransport.BindAsync() -> ListenerPrimary.StartAsync() -> listener.ListenSocket.Listen(LibuvConstants.ListenBacklog, ConnectionCallback, listener) -> listener.OnConnection(stream, status) -> ConnectionCallback() ->new LibuvConnection(this, socket).Start() -> ConnectionHandler.OnConnection() -> connection.StartRequestProcessing() -> ProcessRequestsAsync -> CreateFrame -> await _frame.ProcessRequestsAsync()- _application 为上面的HostingApplication;
- 每个WebHost.StartAsync 将创建唯一的一个HostingApplication实例并在每次请求时使用。
- 由Frame类调用HostingApplication的方法。
下面展示Frame以及HostingApplication:
Frame
public class Frame<TContext> : Frame{ public override async Task ProcessRequestsAsync() { while (!_requestProcessingStopping) { Reset(); EnsureHostHeaderExists(); var messageBody = MessageBody.For(_httpVersion, FrameRequestHeaders, this); InitializeStreams(messageBody); var context = _application.CreateContext(this); try { await _application.ProcessRequestAsync(context); } finally { _application.DisposeContext(context, _applicationException); } } }}HostingApplication
public class HostingApplication : IHttpApplication<HostingApplication.Context>{ private readonly RequestDelegate _application; private readonly IHttpContextFactory _httpContextFactory; public HostingApplication( RequestDelegate application, IHttpContextFactory httpContextFactory) { _application = application; _httpContextFactory = httpContextFactory; } // Set up the request public Context CreateContext(IFeatureCollection contextFeatures) { var context = new Context(); var httpContext = _httpContextFactory.Create(contextFeatures); context.HttpContext = httpContext; return context; } // Execute the request public Task ProcessRequestAsync(Context context) { return _application(context.HttpContext); } // Clean up the request public void DisposeContext(Context context, Exception exception) { var httpContext = context.HttpContext; _httpContextFactory.Dispose(httpContext); } public struct Context { public HttpContext HttpContext { get; set; } }}由此我们发现HttpContext是由HttpContextFactory创建的,其中_httpContextFactory则是上节在WebHostBuilder的BuildCommon注入的
同时在HostingApplication的ProcessRequestAsync方法中,我们看到我们的_application(Startup注册的中间件)被调用了。
IHttpContextFactory。
HttpContextFactory
public HttpContext Create(IFeatureCollection featureCollection){ var httpContext = new DefaultHttpContext(featureCollection); if (_httpContextAccessor != null) _httpContextAccessor.HttpContext = httpContext; return httpContext;}而创建的HttpContext则是DefaultHttpContext类型:
public class DefaultHttpContext : HttpContext{ public virtual void Initialize(IFeatureCollection features) { _features = new FeatureReferences<FeatureInterfaces>(features); _request = InitializeHttpRequest(); _response = InitializeHttpResponse(); } public override HttpRequest Request => _request; public override HttpResponse Response => _response;}Configure
IApplicationBuilder
我们知道在Startup的Configure方法中,通过IApplicationBuilder可以注册中间件。
public interface IApplicationBuilder{ IServiceProvider ApplicationServices { get; set; } RequestDelegate Build(); IApplicationBuilder Use(Func<RequestDelegate, RequestDelegate> middleware);}默认实现类为:
public class ApplicationBuilder : IApplicationBuilder{ private readonly IList<Func<RequestDelegate, RequestDelegate>> _components = new List<Func<RequestDelegate, RequestDelegate>>(); public IApplicationBuilder Use(Func<RequestDelegate, RequestDelegate> middleware) { _components.Add(middleware); return this; } public RequestDelegate Build() { RequestDelegate app = context => { context.Response.StatusCode = 404; return Task.CompletedTask; }; foreach (var component in _components.Reverse()) app = component(app); return app; }}其中Use方法为注册中间件。中间件的本质就是一个Func<RequestDelegate, RequestDelegate>对象。
该对象的传入参数为下一个中间件,返回对象为本中间件。
而Build方法为生成一个RequestDelegate,在HostingApplication构造函数中的参数即为该对象。
在Build方法中,我们看到最后一个中间件为404中间件。其他的中间件都是通过Use方法注册到内部维护的_components对象上。
Use
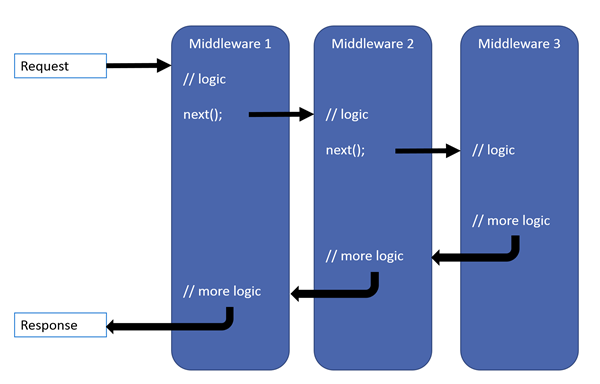
我们通过一个Use示例,来看下中间件的流程:
public void Configure(IApplicationBuilder app, IHostingEnvironment env){ app.Use(next => async context => { Console.WriteLine("A begin"); await next(context); Console.WriteLine("A end"); }); app.Use(next => async context => { Console.WriteLine("B begin"); await next(context); Console.WriteLine("B end"); });}访问结果:
A begin
B begin
B end
A end
流程图:
Run
当我们不使用next 下一个中间件的时候,我们可以使用Run方法来实现
Run方法接受一个RequestDelegate对象,本身是IApplicationBuilder的扩展方法。
public static void Run(this IApplicationBuilder app, RequestDelegate handler);{ app.Use(_ => handler);}Run示例
app.Run(context=>context.Response.WriteAsync("Run Core"));
该示例相当于:
app.Use(next => context => context.Response.WriteAsync("Run Core"));
UseMiddleware
而通常我们添加中间件的方式是通过UseMiddleware来更加方便的操作。
先看下IMiddleware:
public interface IMiddleware{ Task InvokeAsync(HttpContext context, RequestDelegate next);}参数next即为下一个中间件。
有2种实现UseMiddleware的方式:
- 实现IMiddleware接口。
- 基于接口约定的方法。
IMiddleware接口
public class DemoMiddle : IMiddleware{ public Task InvokeAsync(HttpContext context, RequestDelegate next) { return context.Response.WriteAsync("hello middleware"); }}在使用IMiddleware接口的时候,还需要注册该类到DI系统中。
约定
public class DemoMiddle{ private RequestDelegate _next; public DemoMiddle(RequestDelegate next) { _next = next; } public Task InvokeAsync(HttpContext context) { return context.Response.WriteAsync("hello middleware"); }}这种方式,不用再注册到DI中,如果需要对该类构造函数传入参数,直接在app.UseMiddleware<DemoMiddle>("hi1");传入参数即可。
UseWhen
app.Use(next => async context => { await context.Response.WriteAsync("Begin"); await next(context); });app.UseWhen(context => context.Request.Path.Value == "/hello", branch => branch.Use( next => async context => { await context.Response.WriteAsync("hello"); await next(context); }));app.Run(context => context.Response.WriteAsync("End"));当我们访问/hello时,结果为:BeginhelloEnd
分析源码得知在构建管道的时候,克隆一个另外的IApplicationBuilder。
public static IApplicationBuilder UseWhen(this IApplicationBuilder app, Predicate predicate, Action<IApplicationBuilder> configuration){ var branchBuilder = app.New(); configuration(branchBuilder); return app.Use(main => { // This is called only when the main application builder // is built, not per request. branchBuilder.Run(main);// 添加(调用)原来的中间件 var branch = branchBuilder.Build(); return context => predicate(context) ? branch(context): main(context); });}MapWhen
app.Use(next => async context => { await context.Response.WriteAsync("Begin"); await next(context); });app.MapWhen(context => context.Request.Path.Value == "/hello", app2 => app2.Run(context => context.Response.WriteAsync("hello")));app.Run(context => context.Response.WriteAsync("End"));当我们访问/hello时,结果为:Beginhello。
分析源码得知在构建管道的时候,新分支并没有再调用原来的中间件。
public static IApplicationBuilder MapWhen(this IApplicationBuilder app, Predicate predicate, Action<IApplicationBuilder> configuration){ var branchBuilder = app.New(); configuration(branchBuilder); var branch = branchBuilder.Build(); return app.Use(next => context => predicate(context) ? branch(context): next(context));}Map
app.Map("/hello", app2 => app2.Run(context => context.Response.WriteAsync("hello")));当我们访问/hello时,结果为:Beginhello。与MapWhen效果一样。
如果我们只是判断URLPath的话,通常我们会使用Map方法。
以上是常用的注册中间件的方式。
本文链接:http://neverc.cnblogs.com/p/8029419.html
注:本文内容来自互联网,旨在为开发者提供分享、交流的平台。如有涉及文章版权等事宜,请你联系站长进行处理。