一、HTML
HTML是英文Hyper Text Mark-up Language(超文本标记语言)的缩写,他是一种制作万维网页面标准语言(标记)。相当于定义统一的一套规则,大家都来遵守他,这样就可以让浏览器根据标记语言的规则去解释它。
浏览器负责将标签翻译成用户“看得懂”的格式,呈现给用户!(例:djangomoan模版引擎)
翻译成人话:一套规则,浏览器认识的规则。
标准模板:
1 <!DOCTYPE html> #标准规范 2 <html lang="en"> 3 <head> #html头 4 <meta charset="UTF-8"> #字符编码 5 <title>Title</title> #页面头部显示内容 6 </head> 7 <body> 8 <p>主体内容</p> #页面内容主体 9 </body>10 </html>
Doctype标准
Doctype告诉浏览器使用什么样的html或xhtml规范来解析html文档
有和无的区别
BackCompat:标准兼容模式未开启(默认) (浏览器按照自己的方式解析渲染页面)
CSS1Compat:标准兼容模式已开启(自己打开)(浏览器按照W3C的标准解析渲染页面)
(一)<head>页面头部


1 ①页面编码 2 <meta charset="UTF-8" /> 3 4 ②刷新和跳转 5 <meta http-equiv="Refresh" Content="3;Url=http://www.baidu.com"> 6 7 ③关键词 8 <meta name="keywords" content="汽车,汽车之家,汽车网,汽车报价,汽车图片,新闻,评测,社区,俱乐部"/> 9 10 ④描述11 <meta name="description" content="汽车之家为您提供最新汽车报价,汽车图片,汽车价格大全,最精彩的汽车新闻、行情、评测、导购内容,是提供信息最快最全的中国汽车网站。"/>12 13 ⑤X-UA-Compatible14 <meta http-equiv="X-UA-Compatible" content="IE=EmulateIE7" />15 16 #title 标签17 网页头部信息18 19 #link 标签20 <!--css-->21 < link rel="stylesheet" type="text/css" href="css/common.css" >22 23 <!--icon-->24 < link rel="shortcut icon" href="image/favicon.ico">25 26 #style 标签27 在页面中写样式28 < style type="text/css" >29 .bb{30 background-color: red;31 }32 < /style>33 34 #script 标签35 <!--引进文件-->36 < script type="text/javascript" src="http://www.googletagservices.com/tag/js/gpt.js"> </script >37 38 <!--写js代码-->39 < script type="text/javascript" > ... </script >
(二)<body>页面主体
标签一般分为两种:
块级标签:a、span、select 等
行内标签:div、h1、p 等
更多特殊符号-》http://www.cnblogs.com/web-d/archive/2010/04/16/1713298.html
h 标签
标题h1、h2、h3、h4、h5、h6、h7表示不同的大小
span 标签
行内标签-白板
div 标签
块级标签-白板,可以加属性然后可以变身
form 标签
form相当于一个表单,配合input标签submit可以把表单的内容提交到指定位置,提交内容以字典的形式提交{‘user’:xx,'email':xx,'pwd':xx},key值为name属性值


<form action="http://localhost:8888/index" method="post" > #action表示提交动作,把数据提交到指定的路径,methon指定提交类型,默认为get</form>post与get的区别:method默认为get类型,数据会包含在html的头部进行提交,表现形式是点击提交后会在外部url路径上查看提交到的数据表单内容;method如果指定为post类型的话,数据会包含在html的body内进行提交,从外部看不出来里面的信息;两者没有谁安全之说,因为抓包都能抓到
input 系列标签


text、password 用户输入框<body> <form action="http://localhost:8888/index" method="post" > <span>用户:</span><input type="text" name="user"><br /> <span>邮箱:</span><input type="text" name="email"><br /> <span>密码:</span><input type="password" name="pwd"><br /> <input type="button" value="不能提交"> <input type="submit" value="提交"> </form></body>
radio 单选
checkbox 多选
file 上传文件
textarea 多行输入
select 下拉框


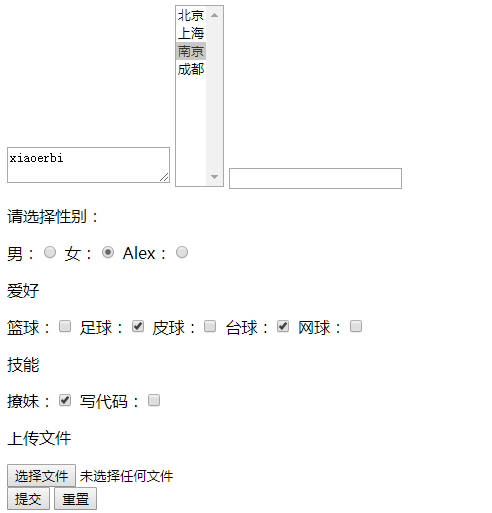
<!DOCTYPE html><html lang="en"><head> <meta charset="UTF-8"> <title>Title</title></head><body> <form enctype="multipart/form-data"> <div> <textarea name="meno" >xiaoerbi</textarea> <select name="city" size="10" multiple="multiple"> <option value="1">北京</option> <option value="2">上海</option> <option value="3" selected="selected">南京</option> <option value="4">成都</option> </select> <input type="text" name="user" /> <p>请选择性别:</p> 男:<input type="radio" name="gender" value="1" /> 女:<input type="radio" name="gender" value="2" checked="checked"/> Alex:<input type="radio" name="gender" value="3"/> <p>爱好</p> 篮球:<input type="checkbox" name="favor" value="1" /> 足球:<input type="checkbox" name="favor" value="2" checked="checked" /> 皮球:<input type="checkbox" name="favor" value="3" /> 台球:<input type="checkbox" name="favor" value="4" checked="checked"/> 网球:<input type="checkbox" name="favor" value="5" /> <p>技能</p> 撩妹:<input type="checkbox" name="skill" checked="checked" /> 写代码:<input type="checkbox" name="skill"/> <p>上传文件</p> <input type="file" name="fname"/> </div> <input type="submit" value="提交" /> <input type="reset" value="重置" /> </form></body></html>

img 图片标签


<a href="https://www.baidu.com"> <img src="i.png" title="yimibadagaoge" style="height: 300px;width: 220px;" alt="索隆"></a>和a标签结合点击图片直接跳转,title指定鼠标放到图片后显示的内容,style定义宽高,alt指定图片不存在时的显示信息
ul、ol、dl 列表标签


<ul> <li>qwe</li> <li>qwe</li> <li>qwe</li> </ul> <ol> <li>qwe</li> <li>qwe</li> <li>qwe</li> </ol> <dl> <dt>qwe</dt> <dd>qwe</dd> <dd>qwe</dd> <dt>qwe</dt> </dl>

table 列表
(1)简单单元格


<table border="1"> <thead> <tr> <td>主机名</td> <td>IP</td> <td>详情</td> </tr> </thead> <tbody> <tr> <td>localhost</td> <td>127.0.0.1</td> <td> <a href="test3.html">点击</a> </td> </tr> <tr> <td>localhost</td> <td>127.0.0.1</td> <td>点击</td> </tr> </tbody>

(2)合并单元格


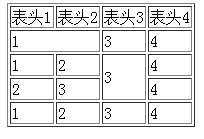
<!DOCTYPE html><html lang="en"><head> <meta charset="UTF-8"> <title>Title</title></head><body><table border="1"> <thead> <tr> <td>表头1</td> <td>表头2</td> <td>表头3</td> <td>表头4</td> </tr> </thead> <tbody> <tr> <td colspan="2">1</td> <!--<td>2</td>--> <td>3</td> <td>4</td> </tr> <tr> <td>1</td> <td>2</td> <td rowspan="2">3</td> <td>4</td> </tr> <tr> <!--<td>1</td>--> <td>2</td> <td>3</td> <td>4</td> </tr> <tr> <td>1</td> <td>2</td> <td>3</td> <td>4</td> </tr> </tbody></table></body></html>

label 标签


<label for="username">用户名</label><input id="username" type="text" name="user" />点击文字使其关联的标签获取光标
(二)CSS
(1)css样式选择器
标签上设置style属性:直接在div里写相对应的样式


1 <body>2 <div style="background-color: #2459a2;height: 48px;">第一层</div>3 <div style="background-color: #2459a2;height: 48px;">第二层</div>4 <div style="background-color: #2459a2;height: 48px;">第三层</div>5 </body>
id选择器:把样式写到head里面,以#开头命名,调用对应样式在div里用id属性指定相应的id名


1 <head> 2 <meta charset="UTF-8"> 3 <title>Title</title> 4 <style> 5 #i1{ 6 background-color: #2459a2; 7 height: 48px; 8 } 9 </style>10 </head>11 <body>12 <div id="i1">第一层</div>13 </body>
class选择器(最常用):把样式写到head里面,以.开头命名,调用对应样式在div里用class属性指定相应的类名,可以多个div调用


1 <head> 2 <meta charset="UTF-8"> 3 <title>Title</title> 4 <style> 5 .c1{ 6 background-color: #2459a2; 7 height: 48px; 8 } 9 </style>10 </head>11 <body>12 <div class="c1">第一层</div>13 <div class="c1">第二层</div>14 <div class="c1">第三层</div>15 </body>
标签选择器:设置div样式,则body里所有的div标签内的内容都会应用此内容


1 <head> 2 <meta charset="UTF-8"> 3 <title>Title</title> 4 <style> 5 div{ 6 background-color: #2459a2; 7 height: 48px; 8 } 9 </style>10 </head>11 <body>12 <div >第一层</div>13 <div >第二层</div>14 <div >第三层</div>15 </body>
关联选择器(层级选择器):只让span里面的div标签应用样式,可多层嵌


1 <head> 2 <meta charset="UTF-8"> 3 <title>Title</title> 4 <style> 5 span div{ 6 background-color: #2459a2; 7 height: 48px; 8 } 9 </style>10 </head>11 <body>12 <div >第一层</div>13 <span>14 <div >span里的div</div>15 </span>16 <div >第三层</div>17 </body>
组合选择器:加,号,相同样式多命名


1 <head> 2 <meta charset="UTF-8"> 3 <title>Title</title> 4 <style> 5 #i1,#i2,#i3{ 6 background-color: #2459a2; 7 height: 48px; 8 } 9 </style>10 </head>11 <body>12 <div id="i1">第一层</div>13 <div id="i2">第一层</div>14 <div id="i3">第一层</div>15 </body>
属性选择器:根据属性进行筛选匹配,只有第一个input标签匹配上对应的样式


1 <head> 2 <meta charset="UTF-8"> 3 <title>Title</title> 4 <style> 5 input[name="James"]{width: 20px;height: 20px;} 6 </style> 7 </head> 8 <body> 9 <input type="text" name="James">10 <input type="text">11 <input type="password">12 </body>
(2)css样式引用
css样式优先级:如果样式不冲突,则样式都应用,如果样式有冲突,style样式优先级最大,其次其他的安装编写的顺序,越靠近越优先


1 <head> 2 <meta charset="UTF-8"> 3 <title>Title</title> 4 <style> 5 .c1{ 6 background-color: red; 7 color: white; 8 } 9 .c2{10 background-color:black;11 }12 </style>13 </head>14 <body>15 <div class="c2 c1" style="color:palegreen" >第一层</div>16 </body>
文件方式引用样式


1 #定义样式并保存到commons.css文件 2 .c1{ 3 background-color: red; 4 color: white; 5 } 6 .c2{ 7 background-color:black; 8 } 9 10 #引用commons.css文件11 <!DOCTYPE html>12 <html lang="en">13 <head>14 <meta charset="UTF-8">15 <title>Title</title>16 <link rel="stylesheet" href="commons.css">17 </head>18 <body>19 <div class="c2 c1" style="color:palegreen" >第一层</div>20 </body>21 </html>
(3)css样式边框


1 #基本边框 2 <body> 3 <div style="border: 1px dotted red;"> 4 第一层边框 5 </div> 6 <!--border:边框宽度 solid:边框样式实线(dotted虚线)颜色:red--> 7 </body> 8 9 #边框其他样式10 <body>11 <div style="height: 48px;12 width: 80%;13 border: 1px solid brown;14 font-size: 16px;15 text-align: center;16 line-height: 48px;17 ">第二层边框</div>18 19 <!--height: 48px 边框高度-->20 <!--width: 80% 宽度页面的80%-->21 <!--border: 1px solid brown 边框宽度、样式、颜色-->22 <!--font-size: 16px; 字体大小-->23 <!--text-align: center; 水平居中-->24 <!--line-height: 48px; 垂直居中-->25 </body>
(4)CSS样式浮动


1 #float 2 <head> 3 <meta charset="UTF-8"> 4 <title>Title</title> 5 <style> 6 .pg-header{ 7 height: 38px; 8 background-color: #dddddd; 9 line-height: 38px;10 }11 </style>12 </head>13 <body style="margin: 0 auto;">14 <div class="pg-header">15 <div style="float: left;">*收藏本站</div>16 <div style="float: right;">17 <a>登录</a>18 <a>注册</a>19 </div>20 </div>21 <div style="width: 300px;border: 1px solid red;">22 <div style="width: 96px;height: 30px;border: 1px solid green;float: left"></div>23 <div style="width: 96px;height: 30px;border: 1px solid green;float: left"></div>24 <div style="width: 96px;height: 30px;border: 1px solid green;float: left"></div>25 <div style="width: 96px;height: 30px;border: 1px solid green;float: left"></div>26 <div style="width: 96px;height: 30px;border: 1px solid green;float: left"></div>27 <div style="clear: both"></div>28 </div>29 </body>30 注:<body style="margin: 0 auto;">消除与浏览器顶部之间的缝隙;<div style="clear: both"></div>子边框浮动后,显示父边框的边框线
(5)display


1 <body> 2 <div style="background-color: red;display: inline">块级</div> 3 <span style="background-color: #2459a2;display: block">行内</span> 4 </body> 5 6 注:display:inline 转换为行内标签;display:block转换为块级标签;另还有display:none不显示 7 8 行内标签:无法设置高度,宽度,padding margin 9 块级标签:设置高度,宽度,padding margin10 11 <body>12 <span style="background-color: #2459a2;display: inline-block;height: 50px;width: 70px">行内</span>13 <div style="background-color: red;display: inline">块级</div>14 </body>15 16 注:display:inline-block 既有inline的属性(默认自己有多少占多少)又有block的属性(可以设置高度、宽度、padding、margin)
(6)边距


1 #外边距margin 2 3 <body> 4 <div style="border: 2px solid red;height: 70px;"> 5 <div style="background-color: green;height: 50px; 6 margin-top: 25px;"></div> 7 </div> 8 </body> 9 10 注:margin-top:25px表示外边距,子边框与父边框top之间的距离为25px11 12 #内边距padding13 14 <body>15 <div style="border: 2px solid red;height: 70px;">16 <div style="background-color: green;height: 50px;17 padding-top: 25px;"></div>18 </div>19 </body>20 21 注:padding-top:25px表示内边距,子边框内自己与top之间的距离为25px
(7)position


1 fixed固定到浏览器某个位置(相当于float) 2 3 返回顶部按钮 4 有个需求,好多页面都有返回顶部的按钮,随着你页面的下拉,按钮永远在页面的右下角,下面就来实现: 5 6 <body> 7 <div style="width: 50px;height: 50px;background-color: black;color: white; 8 position: fixed; 9 bottom: 20px;10 right: 20px;11 ">返回顶部</div>12 <div style="height: 5000px;background-color: #dddddd";>13 </div>14 </body>15 16 实现动态效果,点击返回17 <body style="margin: 0 auto">18 <div onclick="GoTop();" style="width: 50px;height: 50px;background-color: black;color: white;19 position: fixed;20 bottom: 20px;21 right: 20px;22 ">返回顶部</div>23 <div style="height: 5000px;background-color: #dddddd;margin: 0;">ddddddddddddd24 </div>25 26 <script>27 function GoTop() {28 document.body.scrollTop=0;29 }30 </script>31 </body>32 33 固定菜单栏:34 <head>35 <meta charset="UTF-8">36 <title>Title</title>37 <style>38 .pg-header{39 height: 48px;40 background-color: black;41 color: #dddddd;42 position: fixed;43 top:0;44 right: 0;45 left: 0;46 }47 .pg-body{48 background-color: #dddddd;49 height: 5000px;50 margin-top: 50px;51 }52 </style>53 </head>54 <body style="margin: 0">55 <div class="pg-header">头部</div>56 <div class="pg-body">内容</div>57 </body>58 59 relative+absolute(相对与relative固定路径)60 <body>61 <div style="position: relative;width: 500px;height: 200px;border: 1px solid red;margin: 0 auto">62 <div style="position: absolute;left: 0;bottom: 0;width: 50px;height: 50px;background-color: black;"></div>63 </div>64 </body>65 66 多层模态67 68 用了position样式实现三层页面;当页面整个浮动在上面的时候,如果想让页面整体覆盖底层页面,要用到top,right,left,bottom属性,而非margin-top、margin-left....69 70 <body71 <div style="z-index:10;position: fixed;top: 50%;left: 50%;margin-left:-250px;margin-top:-250px;72 background-color: white;height: 500px;width: 500px"></div>73 74 <div style="z-index:9;position: fixed;background-color: black;75 top: 0;76 right: 0;77 left: 0;78 bottom: 0;79 opacity: 0.5"></div>80 81 <div style="height: 5000px;background-color: green"></div>82 </body>83 当页面出现多层时,用z-index:10数值来确定浮动层的上下关系;opacity:0.5设置页面透明度(1表示完全遮住);fixed;top: 50%;left: 50%;margin-left:-250px;margin-top:-250 px最顶层的div进行居中处理;
(8)overflow


1 外层定义div高度和宽度后,最后显示的效果还是以图片的大小为准的,图片把外层div给撑开了,这时候可以用到下面俩个属性 2 overflow:auto 图片出现滚动条 3 <body> 4 <div style="height: 200px;width:140px;overflow: auto"> 5 <img src="i.png" /> 6 </div> 7 </body> 8 9 overflow:auto 图片只显示div设置的大小,其他部分隐藏10 <body>11 <div style="height: 200px;width:140px;overflow: hidden">12 <img src="i.png" />13 </div>14 </body>
(9)hover


1 ##抽屉网的顶部条栏,当鼠标移动到选项栏时,背景颜色会出现变化; 2 <!DOCTYPE html> 3 <html lang="en"> 4 <head> 5 <meta charset="UTF-8"> 6 <title>Title</title> 7 <style> 8 .pg-header{ 9 position: fixed;10 right: 0;11 left: 0;12 top: 0;13 height: 48px;14 background-color: #2459a2;15 line-height: 48px;16 color: white;17 }18 .pg-body{19 margin-top: 50px;20 }21 .w{22 width: 980px;23 margin: 0 auto;24 }25 .pg-header .menu{26 display:inline-block;27 padding: 0 10px 0 10px;28 }29 .pg-header .menu:hover{30 background-color: #BF1919;31 }32 </style>33 </head>34 <body>35 <div class="pg-header">36 <div class="w">37 <a >LOGO</a>38 <a class="menu">全部</a>39 <a class="menu">42区</a>40 <a class="menu">段子</a>41 <a class="menu">1024</a>42 <a class="menu">爆文</a>43 </div>44 </div>45 <div class="pg-body">46 </div>47 </body>48 </html>49 其中.pg-header .menu:hover{background-color: #BF1919}指定当鼠标滑过引用.menu字段时,字段样式变成新定义的样式
(10)background


1 之前一直在用backgroud样式基本上都是设置背景颜色什么,其实background还可以设置背景为图片 2 3 background-image 4 <body> 5 <div style="background-image: url('i.png');height: 700px;width: 700px"> 6 </div> 7 </body> 8 默认div框架有多大,图片重复放置占的位置就有多大 9 10 background-repeat11 <body>12 <div style="background-image: url('i.png');height: 700px;width: 700px;background-repeat: no-repeat">13 </div>14 </body>15 background-repeat有四个属性repeat(默认,重复占满)、no-repeat(不重复)、repeat-x(只横着重复放)、repeat-y(只竖着重复放)16 17 background-position-x、background-position-y18 显示图片中特定的位置图标19 <body>20 <div style="background-image: url('icon.png');height: 20px;width: 20px;21 border: 1px solid red;background-position-x:20px;background-position-y: 40px"></div>22 </body>23 background-position-x表示看背景图片的窗口水平方向想右移动,background-position-y表示看背景图片的窗口垂直向下移动;两者可以简写成:24 25 <body>26 <div style="background-image: url('icon.png');height: 20px;width: 20px;27 border: 1px solid red;background-position:20px 40px"></div>28 </body>29 30 针对background整体还有更加简单的写法:31 element.style {32 background: #f8f8f8 url(image/5.png) -105px -212px no-repeat;33 background-image: url(file:///D:/BaiduYunDownload/s14day14/day14%E8%AF%BE%E4%B8%8A%E6%89%80%E6%9C%89/html/html/image/5.png);34 background-position-x: -105px;35 background-position-y: -212px;36 background-size: initial;37 background-repeat-x: no-repeat;38 background-repeat-y: no-repeat;39 background-attachment: initial;40 background-origin: initial;41 background-clip: initial;42 background-color: rgb(248, 248, 248);43 background: #f8f8f8 url(image/5.png) -105px -212px no-repeat; 同时设定了颜色,图片,位置,是否repeat
(三)JavaScript
(一)简介
JavaScript一种直译式脚本语言,是一种动态类型、弱类型、基于原型的语言,内置支持类型。它的解释器被称为JavaScript引擎,为浏览器的一部分,广泛用于客户端的脚本语言,最早是在HTML(标准通用标记语言下的一个应用)网页上使用,用来给HTML网页增加动态功能。
在1995年时,由Netscape公司的Brendan Eich,在网景导航者浏览器上首次设计实现而成。因为Netscape与Sun合作,Netscape管理层希望它外观看起来像Java,因此取名为JavaScript。但实际上它的语法风格与Self及Scheme较为接近。
为了取得技术优势,微软推出了JScript,CEnvi推出ScriptEase,与JavaScript同样可在浏览器上运行。为了统一规格,因为JavaScript兼容于ECMA标准,因此也称为ECMAScript
两种引用方式:
<head><meta charset="UTF-8"><title>Title</title><!--第一种方式引用js文件--><script src="commons.js"></script><!--第二种方式直接写在html中--><script>alert('James')</script></head>#字符串记得要加引号
(二)常用数据类型
①变量
JavaScript中变量的声明是一个非常容易出错的点,局部变量必须一个 var 开头,如果未使用var,则默认表示声明的是全局变量


<script type="text/javascript"> // 全局变量 name = 'solo'; function func(){ // 局部变量 var age = 18; // 全局变量 gender = "男" }</script>
②数字
JavaScript中不区分整数值和浮点数值,JavaScript中所有数字均用浮点数值表示。
转换:
parseInt(..) 将某值转换成数字,不成功则NaN
parseFloat(..) 将某值转换成浮点数,不成功则NaN
特殊值:
NaN,非数字。可使用 isNaN(num) 来判断。
Infinity,无穷大。可使用 isFinite(num) 来判断


<script> //字符串转换为数字 age="18"; i = parseInt(age);</script>
注:本文内容来自互联网,旨在为开发者提供分享、交流的平台。如有涉及文章版权等事宜,请你联系站长进行处理。