

In this article, we are going to learn about the System.Text.Json library that helps us efficiently and easily handle JSON in our applications.
So, let’s start.
Introduction
Starting from ASP.NET Core 3.0. the new System.Text.Json library has been shipped with the framework, and it’s only getting better over time. The library comes integrated with the latest version of the .NET framework, so it helps to eliminate outside dependencies for handling JSON. It’s a lightweight library that focuses on simple functionality and performance.

What Is JSON?
JSON or JavaScript Object Notation – is a way to format data that uses a specific attribute-value syntax, which makes it pretty intuitive and human-readable. It’s widely used on the internet to transfer and represent information, especially as a part of HTTP requests and responses. It stores attribute-value pairs, arrays, and other arbitrarily defined types of objects.
Most Important Features of the System.Text.Json Library
Before we start with examples, let’s have a quick overview of the library’s most important features.
Serialization and Deserialization
The System.Text.Json serializer and deserializer are built-in to the framework, and they are used, by default, when we are sending HTTP requests and responses with Web APIs. Of course, if we would like to customize our conversions, the library offers a few ways to do it:
- JsonSerializer Class – In this class, we can find exactly what we would expect – all the tools necessary to easily serialize and deserialize JSON with methods such as
Serialize(),Deserialize(),SerializeAsync()etc. - JsonDocument Class – This class is a great tool for both reading and writing JSON. It gives us the ability to create an in-memory read-only Document Object Model (DOM), which provides random access to objects in a JSON payload. We can use this class to write to a new JSON document comprised of cherry-picked elements from another JSON document
- Utf8JsonWriter / Utf8JsonReader classes – These are the classes that lie beneath the library’s straightforward serializer and deserializer. We can also use them as conversion methods if we want even more control over the process
Attributes
With System.Text.Json, we get a lot of different useful attributes. They mark our class properties so that they can get processed in specific ways during serialization and deserialization. Some examples are the [JsonIgnore] and [JsonPropertyName] attributes that we can use to modify the JSON conversion to exclude a certain class property or give it a different name.
JsonSerializerOptions
The library offers specific customization that can be set using the JsonSerializerOptions. With this class, we can set certain rules like using pretty print, making camel case the default JSON attribute name format, etc.
HttpClient Extensions
The library also works as the bottom layer of the System.Net.Http.Json library’s extension methods. They are used to serialize and deserialize JSON documents when we are using the HttpClient class in our projects.
Exploring Serialization with System.Text.Json
To see the System.Text.Json serializer and deserializer in action, let’s create a simple Console application.
Project Setup
To start, let’s create a new Console application project using Visual Studio.
After naming our project, and choosing a location, make sure to choose the latest version of the .NET framework in the Additional Information section.
Since the library already comes integrated with the framework, there is no need for any additional work and we can simply start exploring.
To start, let’s first create two simple classes:
namespace JsonExampleProject1
{
    class Person
    {
        public string Name { get; set; }

        public int Age { get; set; }

        public string StateOfOrigin { get; set; }

        public List<Pet> Pets { get; set; }
    }
}
namespace JsonExampleProject1
{
    class Pet
    {
        public string Type { get; set; }

        public string Name { get; set; }

        public double Age { get; set; }
    }
}
We create two POCO classes – Person and Pet. The Person class has three properties: Name, Age and StateOfOrigin, and a list of pets, while the Pet class has properties Type, Name, and Age.
Using the JsonSerializer Class
To explore how we can use the JsonSerializer class, let’s do some modifications in the Program class:
private static void SerializeExample()
{
var pets = new List<Pet>
{
new Pet { Type = "Cat", Name = "MooMoo", Age = 3.4 },
new Pet { Type = "Squirrel", Name = "Sandy", Age = 7 }
};
var person = new Person
{
Name = "John",
Age = 34,
StateOfOrigin = "England",
Pets = pets
};
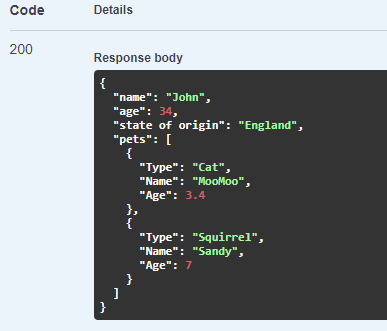
Console.WriteLine(JsonSerializer.Serialize(person));
Console.WriteLine(JsonSerializer.Serialize<Person>(person));
}
We create a new method called SerializeExample(). Inside it, we instantiate an array of objects of class Pet and assign them some values. We also instantiate an object of the Person class with some generic values, including the array of pets.
Then, we pass our newly created object right into the Serialize() method for processing, as the only mandatory parameter.
Besides this, we can also use the Serialize<Tvalue>() method that takes a value specified by the generic type parameter.
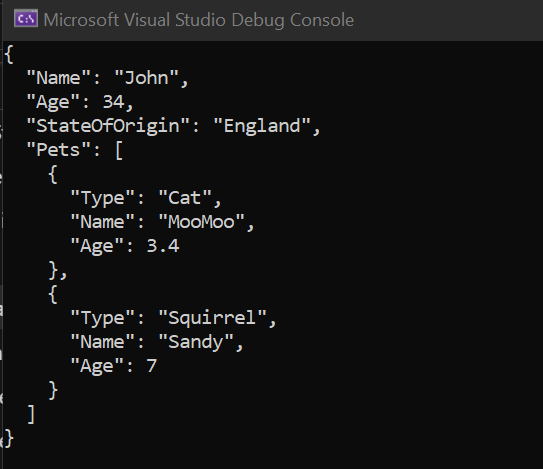
When we start our application and call SerializeExample() from our Main method, we can observe the results of both serialization method calls:

As we can see, the outputs of the two method calls are the same, but that is a pretty messy format of our JSON. We can change that to be more readable by setting some JsonSerializerOptions. We will learn more about those in the part where we explore the options functionality.
Besides these two methods, we can also use SerializeAsync(), which could be more common in REST APIs.
We can also use this method, for example, to write our JSON asynchronously to a file:
private static async Task SerializeToFile()
{
    var pets = new List<Pet>
    {
        new Pet { Type = "Cat", Name = "MooMoo", Age = 3.4 },
        new Pet { Type = "Squirrel", Name = "Sandy", Age = 7 }
    };

    var person = new Person
    {
        Name = "John",
        Age = 34,
        StateOfOrigin = "England",
        Pets = pets
    };

    var fileName = "Person.json";

    using var stream = File.Create(fileName);
    await JsonSerializer.SerializeAsync(stream, person);
    await stream.DisposeAsync();

    Console.WriteLine(File.ReadAllText(fileName));
}
We add a new method called SerializeToFile(). Instead of just serializing the created object as we did before, we create a new file called Person.json and write inside it with the SerializeAsync() method. We pass the person object and the freshly created file stream, as parameters to the serializer method. In the end, we write out the contents of the file to our console.
Of course, we also have to change the signature of the Main method to support async actions:
private static async Task Main()
{
    SerializeExample();
    await SerializeToFile();
}
Now, we can start our application again:

The JSON content written in the file stays the same as before even though we took a slightly different route.
Exploring Deserialization with System.Text.Json
Deserialization works in a pretty similar way. We can use the deserialization methods from the same namespace, with or without the generic type parameter, but instead of the object instance, we will provide them with a JSON string:
private static void DeserizalizeExample()
{
    var jsonPerson = @"{""Name"":""John"",
                        ""Age"":34,
                        ""StateOfOrigin"":""England"",
                        ""Pets"":
                            [{""Type"":""Cat"",""Name"":""MooMoo"",""Age"":3.4},
                            {""Type"":""Squirrel"",""Name"":""Sandy"",""Age"":7}]}";

    var personObject = JsonSerializer.Deserialize<Person>(jsonPerson);

    Console.WriteLine($"Person's name: {personObject.Name}");
    Console.WriteLine($"Person's age: {personObject.Age}");
    Console.WriteLine($"Person's first pet's name: {personObject.Pets.First().Name}");
}
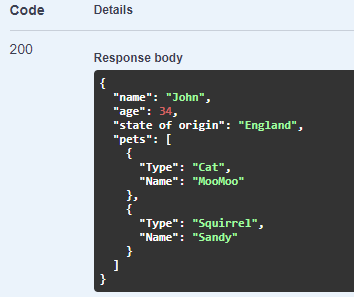
We create a new method called DeserializeExample(). In the method body, we create a string variable and load it with JSON text. We can use the same text that we got as our output during serialization to make it easier.
Then, we deserialize the string using the Deserialize<Tvalue>() method and save that result into the personObject variable. After the deserialization, we print out some properties of our object.
Let’s call the DeserializeExample() method from our Main method and start the application:

Great, our output works like a charm!
Deserializing with the JsonDocument Class
Deserializing is simple when we are familiar with the JSON structure and when we expect a certain input. However, if we don’t have an object type ready for our incoming JSON, we can make use of the JsonDocument class.
Let’s modify our Program class again:
private static void DeserializeWithJsonDocument()
{
    var unknownJsonStructure = @"{""Product name"":""Fork"",
                                    ""Price"": ""300$"",
                                    ""Categories"":
                                        [{""Area"":""Kitchen"",""Description"":""Cooking Utensil""},
                                        {""Area"":""Dinning room"",""Description"":""Dinning Utensil""}]}";

    var unknownObject = JsonDocument.Parse(unknownJsonStructure);
    var productName = unknownObject.RootElement.GetProperty("Product name");

    Console.WriteLine($"Product name: {productName}");

    var categories = unknownObject.RootElement.GetProperty("Categories");

    Console.WriteLine("Categories: ");

    foreach (var category in categories.EnumerateArray())
    {
        Console.WriteLine(category.GetProperty("Area"));
    }
}
We create a new method called DeserializeWithJsonDocument(). In the method body, we first add a new JSON string. There isn’t a class defined in our code that directly matches the JSON data.
We use the JsonDocument class Parse() method, to parse this string into a JsonDocument type.
We can use this new type to extract, for example, the product name from the list of attributes.
For this, we use the RootElement property and then sequentially the GetProperty() method. We make sure to specify the property name which we want to locate. The extracted product name is now a JsonElement type and we can print it out easily.
To access a nested property, for example, the names of all the areas contained inside the Categories array – we extract the categories using the same approach as for the product name. Only in this case, we enumerate the categories as an array. We do this so we can loop over its JsonElements for easy access to the Area attributes.
Make sure to call this method from the Main method, and let’s start the application:
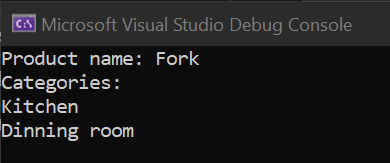
We successfully cherry-picked our product name and the categories it belongs to!
Options for Serialization and Deserialization Actions
So we’ve learned how to serialize and deserialize our objects easily. Let’s now talk a bit more about options that help us customize our JSON reading and writing experience.
WriteIndented Property
If you remember our first printed output, it was a bit of a mess. Let’s fix that with the help of options:
private static void SerializeWithOptions()
{
    var pets = new List<Pet>
    {
        new Pet { Type = "Cat", Name = "MooMoo", Age = 3.4 },
        new Pet { Type = "Squirrel", Name = "Sandy", Age = 7}
    };

    var person = new Person
    {
        Name = "John",
        Age = 34,
        StateOfOrigin = "England",
        Pets = pets
    };

    var options = new JsonSerializerOptions
    {
        WriteIndented = true
    };

    Console.WriteLine(JsonSerializer.Serialize(person, options));
}
In our new method SerializeWithOptions(), we have the same object instantiation as before, but we also create an instance of the JsonSerializerOptions class. In the new options object, we set the WriteIdented property to true. We take this options object and pass it as a second parameter to our Serialize() method.
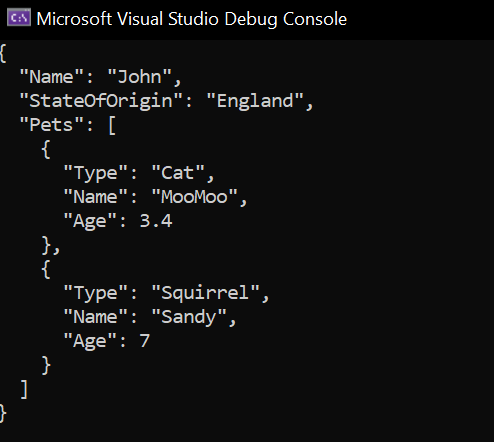
Now let’s call the new SerializeWithOptions() method and check our results again:
That’s a much nicer format of the same JSON text 🙂
Ignoring Null Values
Besides pretty print and many other options, we can, for example, also ignore null values in our JSON.
To see this, let’s first modify our Person class:
class Person
{
    public string Name { get; set; }

    public int? Age { get; set; }

    public string StateOfOrigin { get; set; }

    public List<Pet> Pets { get; set; }
}
We change the Age property to become nullable so that we can instantiate a different object.
We also need to modify our SerializeWithOptions() method:
private static void SerializeWithOptions()
{
    var pets = new List<Pet>
    {
        new Pet { Type = "Cat", Name = "MooMoo", Age = 3.4 },
        new Pet { Type = "Squirrel", Name = "Sandy", Age = 7}
    };

    var person2 = new Person
    {
        Name = "John",
        Age = null,
        StateOfOrigin = "England",
        Pets = pets
    };

    var options = new JsonSerializerOptions
    {
        WriteIndented = true,
        DefaultIgnoreCondition = JsonIgnoreCondition.WhenWritingNull
    };

    Console.WriteLine(JsonSerializer.Serialize(person2, options));
}
Now, during instantiation, we set the Age property of our Person object to null. We also add the DefaultIgnoreCondition property to our options and set it to JsonIgnoreCondition.WhenWritingNull.
We can start our application one more time:
In the output, we can see that our person no longer has the age property serialized, which is exactly what we wanted.
Deserializing Numbers in Quotation Marks
Lastly, let’s see how we can pass options to our deserializer method, to allow it to deserialize numbers when they are written in quotation marks.
Let’s create a new deserialization method:
private static void DeserizalizeWithOptions()
{
    var jsonPerson = @"{""Name"":""John"",
                        ""Age"":""34"",
                        ""StateOfOrigin"":""England"",
                        ""Pets"":
                            [{""Type"":""Cat"",""Name"":""MooMoo"",""Age"":""3.4""},
                            {""Type"":""Squirrel"",""Name"":""Sandy"",""Age"":7}]}";

    var options = new JsonSerializerOptions
    {
        NumberHandling = JsonNumberHandling.AllowReadingFromString
    };

    var personObject = JsonSerializer.Deserialize<Person>(jsonPerson,  options);

    Console.WriteLine($"Person's age: {personObject.Age}");
    Console.WriteLine($"Person's first pet's name: {personObject.Pets.First().Age}");
}
In the method body, in our JSON text, we add quotation marks around the persons’ age and their first pet’s age. We create the options instance and set the NumberHandling property. This property is set to the value of JsonNumberHandling.AllowReadingFromString. This is an enum value for which we have to include the System.Text.Json.Serialization, or add the Serialization prefix.
We pass our options to the deserializer, along with the JSON string, and then print out some properties of our new object.
Of course, this is if you want to explicitly specify your options.
But, there is something called Web defaults for JsonSerializerOptions. It contains several properties set to their default values:
- PropertyNameCaseInsensitive =
true - JsonNamingPolicy = CamelCase
- NumberHandling = AllowReadingFromString
As you can see, we can use these default options by just using a different JsonSerializerOptions constructor overload:
var options = new JsonSerializerOptions(JsonSerializerDefaults.Web);

var personObject = JsonSerializer.Deserialize<Person>(jsonPerson,  options);
Now, we can call the new DeserializeWithOptions() method and start our application:

As expected, our numbers in quotation marks have been deserialized correctly.
Using System.Text.Json in a Web API Project
Let’s use a Web API project to explore more about different attributes that we can use in our JSON processing with System.Text.Json.
Project Setup
Let’s first start by creating a new ASP.NET Core Web API project using Visual Studio.
For this project, you may use the current latest version of the .NET. We will also make use of the Swagger, so make sure to mark the Enable OpenAPI support checkbox.
For simplicity, let’s keep the class structures the same as in our first example project. We are going to define them each in their own .cs file:
namespace JsonExampleProject2
{
    public class Person
    {
        public string Name { get; set; }

        public int? Age { get; set; }

        public string StateOfOrigin { get; set; }

        public List<Pet> Pets { get; set; }

    }
}
namespace JsonExampleProject2
{
    public class Pet
    {
        public string Type { get; set; }

        public string Name { get; set; }

        public double Age { get; set; }
    }
}
To use System.Text.Json attributes as a tool for our JSON conversions, we will mostly be modifying these two files.
Besides the classes, let’s create a simple test controller:
[Route("api/[controller]")]
[ApiController]
public class TestController : ControllerBase
{
    [HttpGet]
    public string Get()
    {
        var pets = new List<Pet>
        {
            new Pet { Type = "Cat", Name = "MooMoo", Age = 3.4 },
            new Pet { Type = "Squirrel", Name = "Sandy", Age = 7 }
        };

        var person = new Person
        {
            Name = "John",
            Age = 34,
            StateOfOrigin = "England",
            Pets = pets
        };

        var options = new JsonSerializerOptions
        {
            WriteIndented = true
        };

        return JsonSerializer.Serialize(person, options);
    }
}
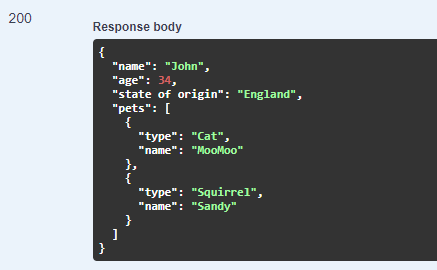
We define a Get() action where we create an instance of the Person class, and a list of objects of the Pet class – same as before. We also instantiate options with a pretty print, and in the end, return the serialized value of our Person object.
When we run our application we can use swagger to send a GET request to our endpoint:
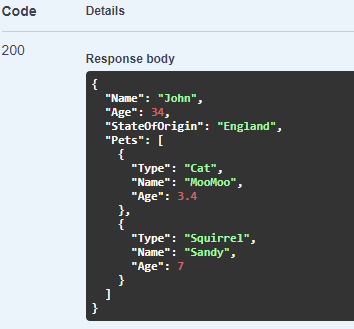
We can see our familiar result in the response body.
Exploring System.Text.Json Attributes
Sometimes we want to deal with JSON documents that don’t follow our naming conventions, or we need to write a property name to a JSON document, that differs from the one defined in our class.
The [JsonPropertyName] attribute is very helpful in these cases so let’s see how we can use it.
First, we are going to modify our Person class:
using System.Collections.Generic;
using System.Text.Json.Serialization;

namespace JsonExampleProject2
{
    public class Person
    {
        [JsonPropertyName("name")]
        public string Name { get; set; }

        [JsonPropertyName("age")]
        public int? Age { get; set; }

        [JsonPropertyName("state of origin")]
        public string StateOfOrigin { get; set; }

        [JsonPropertyName("pets")]
        public List<Pet> Pets { get; set; }

    }
}
An important step is to add the System.Text.Json.Serialization namespace, so that we can use the attributes. We assign the [JsonPropertyName] attribute to each property of the class. Then, by using the attribute, we set the property name to something different than it is in the class definition. Specifically, here we set all property names to lowercase, and change the StateOfOrigin property name to “state of origin”.
Let’s now start the application again, and send a GET request to our endpoint:
We can see that some of our properties now have different names, because of the attributes we added.
Another very useful attribute in the serialization namespace is [JsonIgnore].
To see how it works, let’s modify our Pet class:
using System.Text.Json.Serialization;

namespace JsonExampleProject2
{
    public class Pet
    {
        public string Type { get; set; }

        public string Name { get; set; }

        [JsonIgnore]
        public double Age { get; set; }
    }
}
We also have to add the serialization namespace first, to be able to use this attribute. We decorate the Age property with the [JsonIgnore] attribute.
Let’s restart our application and send another GET request to our endpoint:
As expected, the age of the persons’ pets is no longer visible in our JSON output. We can do this for any class property we’d like.
Exploring System.Text.Json HttpClient Extensions
System.Text.Json library can also make our life easier in situations when we are using HttpClient. It works in the background of the System.Net.Http.Json namespace as a part of certain extension methods that perform automatic serialization and deserialization.
Web API Project Modifications
Let’s modify our Web API project to check out some examples of the extension methods.
To keep it simple, we are going to use our existing Web API example project for this part. We are going to modify the Startup class if you are using .NET 5:
public void ConfigureServices(IServiceCollection services)
{

    services.AddControllers();

    services.AddSwaggerGen(c =>
    {
        c.SwaggerDoc("v1", new OpenApiInfo { Title = "JsonExampleProject2", Version = "v1" });
    });

    services.AddHttpClient("TestClientController",
        c => c.BaseAddress = new Uri("https://localhost:5001/api/"));
}
Or the Program class, if you are using .NET 6 and above:
builder.Services.AddHttpClient("TestClientController",
    c => c.BaseAddress = new Uri("https://localhost:5001/api/"));
We add the HttpClient service inside our ConfigureServices() method. The name “TestClientController” is going to represent our new controller that will mimic our client API. We also set the base address of our target API using options. Since this URI is specific to our example application, make sure to modify it to suit your specific localhost address.
If you want to learn more about using ASP.NET Core with HttpClient, feel free to read our article about it.
Using System.Text.Json HttpClient Extension Methods
To see how the extension methods work, we are going to create a new test client controller:
[Route("api/[controller]")]
[ApiController]
public class TestClientController : ControllerBase
{
    private static IHttpClientFactory _httpClient;

    public TestClientController(IHttpClientFactory httpClient)
    {
        _httpClient = httpClient;
    }

    [HttpGet]
    public async Task<IActionResult> GetJson()
    {
        var client = _httpClient.CreateClient("TestClientController");
        var person = await client.GetFromJsonAsync<Person>("Test");

        return Ok(person);
    }
}
In our new controller, we inject the IHttpClientFactory in the constructor so that we can instantiate an HttpClient.
We add one new endpoint called GetJson() which creates an HttpClient instance using the CreateClient() method, with the client name as the parameter. This will automatically set the base address as we specified in the Startup class.
For the return value, we use the extension method GetFromJsonAsync<Tvalue>(), to which we provide the target endpoint name. Our test client controller shares the same Person class as our URI-defined endpoint, so we also provide that as the generic type parameter.
Now, let’s start the application and make a GET request to our new endpoint:
We can see that when we call the TestClient endpoint, we get the correct result returned from our original TestController endpoint. Behind the scenes, the return value from the endpoint was deserialized from the response body by the System.Text.Json library.
The other extension methods in this namespace include PostAsJsonAsync() and PutAsJsonAsync().
We can use those methods to send a POST or PUT request from the client to a destination URI:
[HttpPost]
public async Task CreatePerson(Person person)
    => await _client.PostAsJsonAsync("person", person);

[HttpPut]
public async Task UpdatePerson(Person person)
    => await _client.PutAsJsonAsync("person", person);
Besides the target URI, both PostAsJsonAsync() and PutAsJsonAsync() take another parameter – an object that we want to post or put. The object is also serialized to JSON by the System.Text.Json library before being sent in the request to the destination.
Conclusion
In this article, we’ve covered the essentials of what is possible with the System.Text.Json library through code examples. We’ve learned about serialization, deserialization, different serializer options, attributes, and HttpClient extensions.
The basic building blocks are here, and you can start exploring the rest in your projects. Have fun!
Excellent coverage of the fundamental functionality needed for a .NET Core website. Thank you.
Could def. need an update. For example the manual serialization on controllers is not required anymore, simply AddJsonOptions to your controllers or – in case you base your API like me on mvc – on the MVCBuilder. And then simply return T, ActionResult<T>, IEnumerable<T> or even IAsyncEnumerable<T> – serialization is handled automatically. That way you can also avoid a lot of manual commenting for swagger, as swagger uses then the actual type for the docs, instead of “string” – without even explicitly having to add [ProducesResponseType]
One to one or many relationship is needed to add [JsonIgnore] on the ef core ForeignKey Linked attribute.
GetFromJsonAsync<Tvalue>() will occur json reader loop error when you use .Include.
//Model class one to one Relationship public class Summoner { [Key] public int KeyId { get; set; } public string? Id { get; set; } //Max length 63 characters. public string? Puuid { get; set; } //Encrypted PUUID. Exact length of 78 characters. //Navigation Properties public virtual PlayerProfile? PlayerProfile { get; set; } public virtual PlayerGameResult? PlayerGameResult { get; set; } public virtual PlayerItem? PlayerItem { get; set; } public virtual PlayerLaneTier? PlayerLaneTier { get; set; } } public class PlayerProfile { public int? Id { get; set; } [JsonIgnore] public Summoner? Summoner { get; set; } public int? Serial { get; set; } }Will System.Text.Json completely replace NewtonSoft library or will we still need it?
There are cases that will require the usage of Newtonsoft library. Like for Patch requests for example. So, as much as I’ve read, System.Text.Json is a go-to option but it is not created to completely replace Newtonsoft.
JsonNumberHandling.AllowReadingFromString is already the default so you don’t have to include it.
We will mention that in the article. It is related to the web defaults.
IgnoreNullValues is obsolete. Use DefaultIgnoreCondition = JsonIgnoreCondition.WhenWritingNull;
Thanks for the suggestion. We will modify the article.