“This is a curate long-list of 20+ Best Practises for Dockerfile for the Year 2020”.
Since the inception of Docker on 20th March 2013, it has already taken the world by storm, by revolutionizing the way how easily applications can be packaged and delivered across multiple platforms with ease. All though containers existed, even before the Docker era, what made Docker stand out of the crowd and making it globally famed was the fact that, it easily bootstrap most of the underlying complexity involved with containers in general, making it fairly available on all the major operating systems & platforms with power of open-source community always backed for better support.
Docker has always been my personal favourite in terms of the technology shift that has happened in recent years. From the transition of the bare-metal machines to Virtual-Machines in most respect. Similarly, Docker is replacing Virtual Machines with containers for all good reasons. Docker, in a nutshell, contains some basic components involved which start off with a simple Dockerfile which is a plain-text file where we write the (code) which contains a straightforward set of steps or instructions which define what needs to be done in simple terms and what you want your application to contain and how it would run. After writing the Docker file we build an image out of it (consider this as executable) which gets created after compiling some code (Dockerfile). After the image is built we need to launch that image. Launching an Image creates a container which is a running instance of the image, which is similar to launching an executable which is running instance of the executable.
CHOOSE MINIMAL BASE IMAGES

Every custom image that we build in docker needs to be built on top of an existing base image, we need to cherrypick and select images that are more minimal & compact. There are various flavours available which offer light-weight images. These include Alpine, Busybox and other distribution-specific images like Debian, Ubuntu, CentOS which have -slim *or *-minimal version of them to choose from.
While choosing a base image, it does need to be a perfect mix of choosing the image which offers the needed support, tools and binaries along with being lightweight. As some time you might also come across issues where choosing a lightweight image involves a trade-off with compatibility with the application and not having the needed dependencies or libraries need to run the application.
FROM alpine

WORKDIR /app

COPY package.json /app

RUN npm install

CMD [“node”,“index.js”]
REMOVE CACHE PACKAGES
 on [Unsplash](https://unsplash.com?utm_source=medium&utm_medium=referral)](https://res.cloudinary.com/practicaldev/image/fetch/s--nmTMEbW2--/c_limit%2Cf_auto%2Cfl_progressive%2Cq_auto%2Cw_880/https://cdn-images-1.medium.com/max/8064/0%2A0Sq1g_FNhDD8JmqR)
For our application to run inside of a container it often requires a runtime environment, dependencies & binaries. While trying to install packages from package-manager such as (apt, apk, yum), it often first downloads the packages from the remote source-repositories on to the local machine and then installs the package. After installing packages, often at times cache package files that were downloaded get stored and consume additional unnecessary space. The best recommendation is to remove these cached/package files after the package is installed, this further optimizes the docker image.
Depending on the type of the image which is used there are different package managers which have default locations where the package-managers cache is been stored, some of which are listed below.
**Image/Distro: **Debian / Ubuntu
**Package Manager: **apt
*Location of the Cache: */var/cache/apt/archives
**Image/Distro: **Alpine
**Package Manager: **apk
*Location of the Cache: */var/cache/apk
**Image/Distro: **centos
**Package Manager: **yum
*Location of the Cache: */var/cache/
In the example below, we will be installing Nginx webserver to server static HTML webpages. As we install the Nginx package alongside we will also remove the cache packages that have been stored in the specific path of the cache directory. In this case, as we are using alpine we have specified the directory which contains the cache for the packages.
FROM alpine

RUN apk add nginx && **rm -rf /var/cache/apt/***

COPY index.html /var/www/html/

EXPOSE 80

CMD [“nginx”,“-g”,“daemon off;”]
An alternative to the above solution in the case of alpine is to use –no-cache which ensures that no cache is stored for the package that would be installed, which removes the additional need of deleting the packages manually.
FROM alpine

RUN apk add –no-cache nginx

COPY index.html /var/www/html/

EXPOSE 80

CMD [“nginx”,“-g”,“daemon off;”]
AVOID MULTIPLE LAYERS

Wow! this burger is an eye-candy with these extra layers of patty & cheese, which makes it really yummy & heavy. Docker images are similar to this burger with each extra layer which gets added to the Dockerfile file while building the image it makes it more heavier. It’s always recommended to make sure to keep the number of layers as low as possible.
Below is a Dockerfile that contains instruction where we install Nginx along with other utilities that are needed. In the case of Dockerfile, each new line of instruction forms a separate layer.
FROM alpine

RUN apk update

RUN apk add curl

RUN apk add nodejs

RUN apk add nginx-1.16.1-r6

RUN apk add nginx-mod-http-geoip2-1.16.1-r6

COPY index.html /var/www/html/

EXPOSE 80

CMD [“nginx”,“-g”,“daemon off;”]
Above Dockerfile can be optimized with the help of chaining and effectively using && and ** where ever needed to reduce the number of layers created for the Dockerfile.
FROM alpine

RUN apk update && apk add curl nginx nginx-mod-http-geoip2-1.16.1-r6 \

rm -rf /var/cache/apt/*

COPY index.html /var/www/html/

EXPOSE 80

CMD [“nginx”,“-g”,“daemon off;”]
With the help of chaining, we have clubbed most of the layers and avoided creating multiple layers which overall helps to optimize the Dockerfile to make the burger look even more Yummy.
DON’T IGNORE .DOCKERIGNORE

.dockerignore *as the name suggests, is a quick and easy way to ignore the files that shouldn’t be apart of the Docker image. Similar to the *.gitignore **file which ignores the files from being tracked under version control. Before going further any further, let’s understand **build-context. While building a Dockerfile all files/ folders in the current working directory are copied & used as the build context. The tradeoff here is that if the current working directory from where we are building the Dockerfile contains Gigabytes of data, in that case, it often increases the unnecessary build time, well that’s a problem, does that mean we have to move the Gigabytes of data to separate directory while building Dockerfile, Naah!!, but then how do we solve this?
.dockerignore to your rescue, it can be used for a couple of use-cases some of which I have been mentioned below:
Ignore files & Directories which are not needed to be part of the image which will be built.
Avoid accidentally copying Sensitive data.
Let’s try to understand this a bit better with an example of Dockerfile in which we will be dockerize a nodejs application and use .dockerignore to ignore the files/directories which are not required to copied at the time of building this image.
-
Ignore unrequired files & directories
FROM node:10
WORKDIR /nodeapp
COPY package.json ./
RUN npm install
COPY . .
EXPOSE 8888
CMD [ “node”, “index.js” ]
In this case, we are choosing node:10 as the base image, setting the app as the working directory for our docker image, exposing port 8888 for external access, after which we copy the package.json and then install all the dependencies mentioned in package.json using npm which will create a node_modules directory which will contain all the latest dependencies installed under it after which comes the crucial part where we copy all the contents from our current working directory in the docker image. Often at times while copying all the contents from the current working directory there is certain files/directory which is not needed, in this case, its node_modules because we have already installed the latest binaries using npm install. so with that in mind, we can add node_modules in the .dockerignore to avoid it being copied over while the image gets build.
2. Avoid copying sensitive details.
Developers cannot deny the fact of storing .env, ssh keys, certificates, and files that contain sensitive details in their local development environment (been there done that), while it makes things easy to access it exposes the overall system to a whole new level of vulnerabilities and security loops-holes. however, these practices should be avoided by all means, as well as in order to prevent further damage in a development environment that contains Docker the best thing that can be done is to avoid these files from getting copied over in the docker image that we are building. This can be easily done with the help of .dockerignore by specifying the files that need to be avoided from being accidentally copied over.
So ideal here’s how our .dockerignore file should like
node_modules

.env

secrets/

*pem

*.md
In this case, we have added, node_modules which isn’t needed as mentioned above, .env as it might contain sensitive details or variables specific to the local development environment which shouldn’t create a conflict in other environments such as staging, production. We have also excluded all sensitive data stored in the .*pem* files as well as the files that are present in the secret folder along with markdown/documentation files that are often not needed inside of a Docker Imag
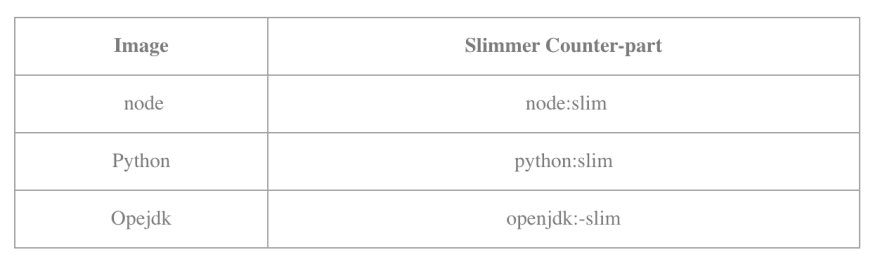
CHOOSE SLIM VARIANTS
 on [Unsplash](https://unsplash.com?utm_source=medium&utm_medium=referral)](https://res.cloudinary.com/practicaldev/image/fetch/s--ssMe8klF--/c_limit%2Cf_auto%2Cfl_progressive%2Cq_auto%2Cw_880/https://cdn-images-1.medium.com/max/16384/0%2AEsomby0oBJnh_MUO)
While choosing a base image, one should prefer to choose a much slimmer & minimal base image. They are often tagged as -slim or -minimal. These images are lighter and have far less footprint as compared to their default counterparts.
Here are a couple of examples of a slim version vs default counterparts.
CUT THE ROOT
 on [Unsplash](https://unsplash.com?utm_source=medium&utm_medium=referral)](https://res.cloudinary.com/practicaldev/image/fetch/s--16yMLFcG--/c_limit%2Cf_auto%2Cfl_progressive%2Cq_auto%2Cw_880/https://cdn-images-1.medium.com/max/12000/0%2A8vpif4-d_NuTO53A)
Every image that we built using docker has default user as root, well that is a security evil, hence we refer to it as “cut the root”. Most of the time, we don’t need the user for the images to be root, as we can specify a default user with all the minimal permission needed for the application to function inside of the container
Below is an example of an image in which we don’t specify a user which means the default user is **root, **Well that’s where we have opened a whole new level of a security loophole.
FROM node:10

WORKDIR /app

COPY package.json ./

RUN npm install

COPY . .

EXPOSE 8888

CMD [ “node”, “index.js” ]
Now, since we are aware of the fact that having the default user means root in order to avoid this we can specify the default user besides root.
FROM node:10

RUN user add -m nodeapp

USER nodeappuser

RUN whoami

WORKDIR /app

COPY package.json ./

RUN npm install

COPY . .

EXPOSE 8888

CMD [ “node”, “index.js” ]
REMOVE THE UNWANTED

While trying to dockerize an application our primary goal is to make sure that the application run’s inside of a docker container successfully. It often happens that after choosing the base image, there are a lot of tools and packages, utilities that do come along with the image its either that we can choose to use -slim /-minimal version of the image or prefer to remove tools and utilities which might not be needed.
TAG WISELY

Tags are a unique way for the image to be identified. While tagging the image we can use any specific naming convention of our choice but its would-be really is optimal to choose the image tag based upon features, commit, or something which is more meaningful. Tags are for the end-user to choose which version of the image to use
Example of tagging involves tagging them with an incremental version of the image or use git versioning hash to be used, all of this can be integrated into your CI/CD pipelines for automating the purpose of tagging the images
SO NO TO LATEST TAG
 on [Unsplash](https://unsplash.com?utm_source=medium&utm_medium=referral)](https://res.cloudinary.com/practicaldev/image/fetch/s--u1lyANZ4--/c_limit%2Cf_auto%2Cfl_progressive%2Cq_auto%2Cw_880/https://cdn-images-1.medium.com/max/7744/0%2Acjx71mKIEPn1AnqB)
Been there done that, haven faced a lot of issues with docker images being tagged*: latest* , here are a couple of reasons why I prefer not to use the latest tag anymore.
myimage: latest is similar for it being tagged with nothing, or let’s say the default myimage (which has no tags)
Avoid using the latest tags for Kubernetes in production as that makes it far hard to debug and find out which version might have caused the problem. That’s why it’s often recommended to tag images meaningfully with a specific version which depicts the changes which occur and rollback if needed. It breaks the whole philosophy behind unique tags that depict different versions.
PUBLIC OR PRIVATE REGISTRY
The question here is to choose between a Public Image or a Private Image?
Public images are great, basic, and easy to use for smaller teams that are not that concerned about the overall security of the system.
Private images stored with an added layer of security and ensure that only authorized personnel can access these images. Docker hub, as well as a couple of other container registry tools, provide the option to choose between Public or private images (although in the case Docker hub you can only choose to have 1 image as private in the default-free plan)
KEEP IT SINGLE

Keep it Single, what it really means though is to keep the philosophy of single application for a single container. This applies to a lot of real-world things as well, The Single Responsibility Principle for software design also applies to Docker images as well. An image should represent only a single piece of application, thereby avoiding the overall complexity.
It’s often a good practice having a modular approach towards dockerizing the whole application stack, which might get involved which solving the issues that might arise unexpectedly. For example: If we trying to dockerize an application that has a dependency for MYSQL as the database we shouldn’t club both the application as well as the database in a single image, but rather split both the instances in separate Docker images.
USE LINTER
 on [Unsplash](https://unsplash.com?utm_source=medium&utm_medium=referral)](https://res.cloudinary.com/practicaldev/image/fetch/s--k9XZNKV4--/c_limit%2Cf_auto%2Cfl_progressive%2Cq_auto%2Cw_880/https://cdn-images-1.medium.com/max/12032/0%2AcXGEh5cZsmKf-kl9)
Linter is a simple piece of software that analyzes the code for a given language and then detects errors, suggests best practices write from the moment that you are writing the code. There are a couple of linters which are available for each language. In the case of Docker, we do have a couple of linters that you can choose, some of which are mentioned below.
My personal favorite is Docker Linter which is vscode extension which indicates warnings or syntactic errors right as you go.
DONT STORE SECRETS

Just how it is in real life, never disclose your secrets. Same when it comes to Dockerfile never store plaintext username, password, or other sensitive so that it gets revealed. To avoid secrets from being stored using .dockerignore to prevent accidentally copying files that might contain sensitive information.
AVOID HARD CODING

While this principle does not just apply to Dockerfile but also Software Design in general, it’s often not recommended to hard-code values inside of a Dockerfile. The best example could be instead of hardcoding specific version of the software which might update or need to change we can dynamically pass the values for them at build time using ARGS.
*ARGS *— is a keyword in Dockerfile that allows us to dynamically pass values to the Dockerfile at build time.
To better understand this, let's have an example.
ARG VERSION

FROM node:$VERSION

WORKDIR /app

COPY package.json ./

RUN npm install

COPY . .

EXPOSE 8888

CMD [ “node”, “index.js” ]
Using Dynamic values to pass and build the images.
docker build -t testimage –build-arg VERSION=10 .

docker build -t testimage –build-arg VERSION=9 .
With this technique, we can dynamically decide the version of the base image to choose from rather than hardcoding it and pass the value of the version at runtime
AVOID DEBUGGING TOOLS
 on [Unsplash](https://unsplash.com?utm_source=medium&utm_medium=referral)](https://res.cloudinary.com/practicaldev/image/fetch/s--R69m3kcA--/c_limit%2Cf_auto%2Cfl_progressive%2Cq_auto%2Cw_880/https://cdn-images-1.medium.com/max/11060/0%2AKsAqrH0lR5fIGWCd)
While building the image their often at times we add debugging tools such as curl, ping, netstat, telnet, and other networking utilities which further increase the overall size of the image. It might be a good choice to avoid adding these debugging tools in the Dockerfile and only install them when actually needed at runtime.
ADDING METADATA

LABEL is a keyword in the Dockerfile which adds metadata details about Dockerfile.
LABEL allows text-based metadata details to be added to the Dockerfile which adds more verbose information. LABEL can be used to add details about the maintainer name and email address for the Dockerfile,. In the example below, we have added details about the maintainer as well as the version of the image.
FROM node:10

**LABEL version=“1.0” maintainer=“Chris Rego <cXXXXXXo@gmail.com>”**

WORKDIR /app

COPY package.json ./

RUN npm install

COPY . .

EXPOSE 8888

CMD [ “node”, “index.js” ]
USING VULNERABILITY CHECK

Vulnerability check!
With the recent attack on Tesla’s Kubernetes Infrastructure, it made everyone understand that the move from Bare-Metal-Machines to Virtual-Machines all the way up to containers never fixes the security loopholes that often get left behind. Well, there are a couple of best practises in terms of security that can be followed while Dockerizing and application such as taking care of secrets/credentials, avoid using root user as the default user for the container and couple of others. A better approach to counter-attack security vulnerabilities in the container sphere is to include tools / technology-driven towards performing reliable security checks towards the container which are present in your environment. There are a couple of tools present that can be added to your security arsenal.
AVOID COPYING EVERYTHING

It’s always good to COPY , but it’s wise to copy selectively. In the case of Docker, it’s recommended to try to avoid using COPY . . which tends to copy everything from your current work directory to that of your Docker image. It’s recommended to choose only the files which are needed to be copied as well as also specify files in .dockerignore from accidentally copying (unwanted or files that contain sensitive data)
FROM node:10

WORKDIR /app

COPY package.json ./

RUN npm install

COPY . .

EXPOSE 8888

CMD [ “node”, “index.js” ]
For example below we avoid the use of copying everything and rather specify only the files/directory which is exclusively needed which decreases the risk of an accidental copy of unwanted data which might ultimately lead to a bloated Docker image as well as increased build time overall.
FROM node:10

WORKDIR /app

COPY package.json ./

RUN npm install

COPY index.js src ./

EXPOSE 8888

CMD [ “node”, “index.js” ]
USE WORKDIR WHEN NEEDED

WORKDIR is another important keyword in a Dockerfile that helps to do most of the heavy lifting and avoids the additional use of creating & navigating to a specific working directory when needed.
WORKDIR can be extensively used in a specific use-case where we involve writing an additional step in Dockerfile which involves navigating to the specific directory. In that case, we safely remove these references of navigation i.e. cd by just using WORKDIR
FROM node:10

RUN mkdir -p /app/mynodejsapp

COPY package.json /app/mynodejsapp

RUN cd /app/mynodejsapp && npm install

COPY . ./app/mynodejsapp

EXPOSE 8888

CMD [ “node”, “index.js” ]
In this case, we have to create a folder using **mkdir **and then for each additional reference we have to mention the whole path for that specific folder and also it involves navigating to the folder using cd, all of this additional reference which is present can be replaced with a simple WORKDIR
FROM node:10

WORKDIR /app/mynodejsapp

COPY package.json ./

RUN npm install

COPY . .

EXPOSE 8888

CMD [ “node”, “index.js” ]
In this case, WORKDIR automatically creates a folder if it doesn’t exist as well there is no additional need for navigation to the current work directory as WORKDIR as already done what it’s supposed to do.
MULTI-STAGE BUILDS
 on [Unsplash](https://unsplash.com?utm_source=medium&utm_medium=referral)](https://res.cloudinary.com/practicaldev/image/fetch/s--w84IJdfE--/c_limit%2Cf_auto%2Cfl_progressive%2Cq_auto%2Cw_880/https://cdn-images-1.medium.com/max/12032/0%2A5Lm01m4C61-XROIb)
The multi-stage build technique is best suited in the scenario where the docker image contains the process of building the application inside of the Dockerfile, While it’s fine to build the application with all dependencies but for further optimization, we can further segregate the process of build and final deployment which is needed into two stages. Dividing the whole image into two stages helps to make sure that we avoid unnecessary dependencies that get early needed while building the application and which aren’t needed anymore after the build.
Using Multi-Stage build is a good practice as it encourages to keep only the things which are needed in the final Docker image and leaving behind all the build-dependencies and other files that are not needed.
# STAGE ONE: INVOLVES BUILDING THE APPLICATION

FROM node:10 AS build

WORKDIR /myapp

COPY package.json index.js ./

RUN npm install ./

# STAGE TWO: COPYING THE ONLY CONTENTS

# NEEDED TO RUN THE APPLICATION WHILE

# LEAVING BEHIND THE REST

FROM node:10-prod

WORKDIR /myapp

COPY –from=build /app/package.json /app/index.js ./

COPY –from=build /app/node_modules /app/node_modules ./

EXPOSE 8080

CMD [“node”, “/app/index.js”]
In this above example, we have separated the whole Dockerfile into two stages. The first stage involves installing the required dependencies and then copy only the files that we actually need into the second stage which will be the final build that will be used. This approach offers separation of concern as well as ensures that we can cherry-pick and select what really goes inside of the final build which will be used.
LASTLY CACHE

Let’s talk about something which is really important now that is cache.
Packaging and Building overall takes a lot of time, the same applies while building a Dockerfile which contains a series of steps that ultimately gets build into a docker image. While building a Docker Image, Docker will build step-by-step from top-to-bottom and checks if any step which is mentioned already has a layer which is present in the cache, if the layer already exists then it doesn’t build a new layer rather it will use an existing layer which overall saves a lot of time.
Caching proves effectively helpful while updating changes to the Dockerfile as well as when the Dockerfile contains often series of instruction which involves downloading specific packages, over the network often takes more time as well as consumes additional network bandwidth this can be reduced drastically with the help of caching. Although Docker provides cache by default there are chances that the cache might break due to changes that are detected which is expected behavior. So it’s the end-user responsibility to ensure that the instruction which is present in the Dockerfile is played out in specific order to avoid the cache from breaking as the order matters for caching.
Caching in Docker follows a chain reaction so that at the beginning itself if there are changes that are detected in the Dockerfile then the instruction mentioned after that, are not consider to be cached and that basically breaks caching. Therefore it’s often recommended to include steps that are predicted not to change frequently at the beginning of the Dockerfile which will ensure that caching won’t break. Docker will cache the results of the first build of a Dockerfile, allowing subsequent builds to be super fast. The cache will only work only if there is a cache stored if we delete that cache next time we try to build the image it will rebuild from scratch and consume time. Docker works quite intelligently and provides on the go caching without any additional configuration.
Docker is quite a flexible tool it allows us to completely ignore the cache while building the image which can be done using –no-cache. This makes sure that while building the image caching mechanism doesn’t work but this leads to an increase in the overall build time.
THIS NOT THE END

As I had promised this is a 20+ list of best practices for Dockerfile for 2020, I will be adding more to the list as I go along on this dark, unknown endeavor in building great Docker containers. If you did


Top comments (4)
Some of those are not "best practices" at all:
A useful command to view the size of the layers is docker history
For example
DockerSlim can also help getting some of the outcomes mentioned in the post (fewer layers, smaller images). It also has a lint command.
+1 on Dockerslim. I have had great sucess using the tool github.com/docker-slim/docker-slim