
In this article, we are going to learn how to use Attribute-based access control (ABAC) to secure our Blazor WebAssembly application. We have already learned about Role-based access control (RBAC) and how to use roles to secure our app. Here, we are going to do a quick comparison between RBAC and ABAC. Also, we are going to show how to implement Attribute-based access control to provide policies required for the application’s security. We just want to mention that you can find ABAC referred to as Policy-Based Access Control (PBAC) or Claims-Based Access Control (CBAS), so don’t get confused if you find the names like these ones.
It is very important that you are familiar with the IdentityServer4, OAuth2, and OIDC concepts. If you are not, we strongly suggest you read our IdentityServer4, OAuth2, and OIDC series. There, you can find complete navigation for this series as well.
So, let’s get going.

Attribute-Based Access Control vs Role-Based Access Control
As we said, we already learned about RBAC and we know that it uses roles to grant access to the protected resources. Each role contains a set of rights that we can use to secure our app. For example, the Admin can access the privacy page and the Visitor can’t, even though both users are authenticated. Also, we have seen that a single user may have multiple roles and for that specific case, we had to create a bit of additional logic.
The attribute-based access control uses policies instead of roles to grant access. These policies combine a set of claims together. For example, our user must have a specific job title and also be from a specific country and work for a specific company, and be born between x and y date. So as you can see, the main advantage of the policies is that they allow a combination of more complex rules than RBAC. We could do the same with RBAC but it would require a lot of work and a lot of roles combined. This could lead to a system hard to maintain.
Attribute-Based Access Control has been around for quite some time and it is favored over Role-Based Access Control. There is built-in support for ABAC in ASP.NET Core applications, therefore for the Blazor app as well, and we are about to see how to implement it in our application.
Creating an Authorization Policy for the Attribute-Based Access Control Implementation
We have to create an authorization policy for both API and Blazor projects. That’s because we can’t protect the code in the client application. So, the best solution is to create a Shared project.
Let’s do exactly that, create a shared .NET Standard Class Library project and name it SharedProject.
Then, we are going to add this new project to both API and client applications using Add/ExistingProject option. Also, we have to reference the SharedProject from both API and client projects.
After that, we are going to install the Microsoft.AspNetCore.Authorization package inside the SharedProject:

After the installation, we are going to create a new Policy class in the SharedProject:
public static class Policy
{
    public const string CountryAndJobPosition = "CountryAndJobPosition";

    public static AuthorizationPolicy CountryAndJobPositionPolicy()
        => new AuthorizationPolicyBuilder()
        .RequireAuthenticatedUser()
        .RequireClaim("country", "USA")
        .RequireClaim("position", "Administrator")
        .Build();
}
First, we create a policy name with the string constant. Then, we create a method that returns an AuthorizationPolicy and applies different claims inside that policy. In this case, we require our user to be authenticated, to live in the USA, and to have an Administrator job position.
Of course, we could include the role claim to this policy as well. If we want to do that, all we have to do is to attach a call to the RequireRole method.
So, as you can see, we can combine multiple claims inside a single policy and use it as our authorization mechanism.
One more thing. These claims (country and position) must be present inside the user configuration. And there are. If we inspect the InMemoryConfig class on the IDP level, we can find both claims applied for both users:
public static List<TestUser> GetUsers() =>
    new List<TestUser>
    {
          new TestUser
          {
             ...
              Claims = new List<Claim>
              {
                  ...
                  new Claim("position", "Administrator"),
                  new Claim("country", "USA")
              }
          },
          new TestUser
          {
             ...
              Claims = new List<Claim>
              {
                  ...
                  new Claim("position", "Viewer"),
                  new Claim("country", "USA")
              }
          }
    };
Also, both claims are provided for the IdentityResources in the same class:
public static IEnumerable<IdentityResource> GetIdentityResources() =>
    new List<IdentityResource>
    {
        new IdentityResources.OpenId(),
        new IdentityResources.Profile(),
        new IdentityResources.Address(),
        new IdentityResource("roles", "User role(s)", new List<string> { "role" }),
        new IdentityResource("position", "Your position", new List<string> { "position" }),
        new IdentityResource("country", "Your country", new List<string> { "country" })
    };
Good.
Now we can move on.
Authorization Policy Implementation in the Blazor WebAssembly App
Our Blazor WebAssembly application must have an access to the claims from our policy. So, we have to include both claims inside the client configuration in the InMemoryConfig class:
new Client
{
       ClientId = "blazorWASM",
       AllowedGrantTypes = GrantTypes.Code,
       RequirePkce = true,
       RequireClientSecret = false,
       AllowedCorsOrigins = { "https://localhost:5020" },
       AllowedScopes =
       {
           IdentityServerConstants.StandardScopes.OpenId,
           IdentityServerConstants.StandardScopes.Profile,
           "companyApi",
           "position",
           "country"
       },
       RedirectUris = { "https://localhost:5020/authentication/login-callback" },
       PostLogoutRedirectUris = { "https://localhost:5020/authentication/logout-callback" }
}
Don’t forget to remove the CompanyEmployeeOAuth database from the SQL server. As soon as we start our IDP app, we will create a new database with the updated data.
Now, we can move on to the client app.
Let’s open the appsettings.json file, and add two new scopes to the DefaultScopes array:
{
    "oidc": {
        "Authority": "https://localhost:5005/",
        "ClientId": "blazorWASM",
        "ResponseType": "code",
        "DefaultScopes": [
            "openid",
            "profile",
            "companyApi",
            "position",
            "country"
        ],
        "PostLogoutRedirectUri": "authentication/logout-callback",
        "RedirectUri": "authentication/login-callback"
    }
}
Then, we can open the Program.cs class and register our authorization policy:
builder.Services.AddOidcAuthentication(options =>
{
    builder.Configuration.Bind("oidc", options.ProviderOptions);
    options.UserOptions.RoleClaim = "role";
})
.AddAccountClaimsPrincipalFactory<MultipleRoleClaimsPrincipalFactory<RemoteUserAccount>>();

builder.Services.AddAuthorizationCore(opt =>
{
    opt.AddPolicy(
        Policy.CountryAndJobPosition,
        Policy.CountryAndJobPositionPolicy());
});

await builder.Build().RunAsync();
The AddAuthorizationCore method adds the authorization services to the IoC. Inside, we call the AddPolicy method to register our authorization policy. Of course, we have to provide the policy name and the method that combines claims inside a single policy.
Attribute-Based Access Control Implementation
Let’s open the Privacy.razor file and modify our [Authorize] attribute to accept our policy:
@attribute [Authorize(Policy = SharedProject.Policy.CountryAndJobPosition)]
So, instead of the Roles attribute, we are using the Policy attribute and provide a name for the policy.
Before we test this, let’s just remove the Role authorization from the Privacy link in the NavMenu component and add policy:
<AuthorizeView [email protected]>
    <Authorized>
        <li class="nav-item px-3">
            <NavLink class="nav-link" href="privacy">
                <span class="oi oi-list-rich" aria-hidden="true"></span> Privacy
            </NavLink>
        </li>
    </Authorized>
</AuthorizeView>
Now, we can start our API, IDP, and Client applications and test this with both users:
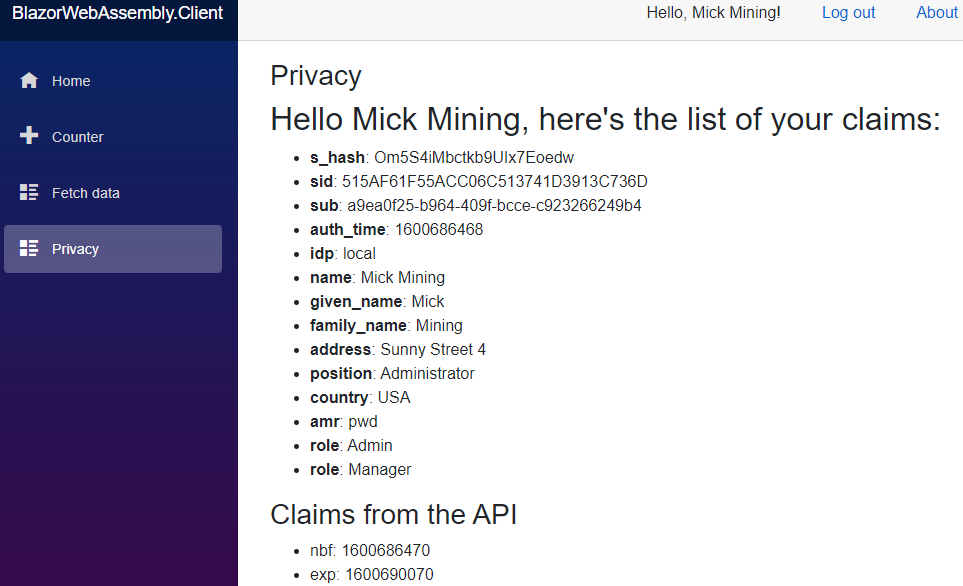
As we can see, the Privacy link is available and we can access the page.
But, if we log in as Jane:
It is obvious that our policy works since Jane doesn’t have an Administrator job position.
Applying Policies on the Web API Project
To apply policies on the Web API’s side, we have to configure it in the same way we did in the client app:
services.AddAuthorization(opt =>
{
    opt.AddPolicy(
    Policy.CountryAndJobPosition,
    Policy.CountryAndJobPositionPolicy());
});

services.AddAuthentication("Bearer")
    .AddJwtBearer("Bearer", opt =>
    {
        opt.RequireHttpsMetadata = false;
        opt.Authority = "https://localhost:5005";
        opt.Audience = "companyApi";
    });

services.AddControllers();
In .NET 6 or above:
builder.Services.AddAuthorization(opt =>
{
    opt.AddPolicy(
        Policy.CountryAndJobPosition,
        Policy.CountryAndJobPositionPolicy());
});
Then, in the CompaniesController, we are going to remove the role authorization from the Privacy action and apply our new policy:
[HttpGet("Privacy")]
[Authorize(Policy = Policy.CountryAndJobPosition)]
And that’s all it takes.
We can test this again with Mick, and we will see that we have access to the Privacy action.
But, if we remove the authorization part from the Privacy page on the client application:
@page "/privacy"
@using Microsoft.AspNetCore.Authorization
@*@attribute [Authorize(Policy = SharedProject.Policy.CountryAndJobPosition)]*@
Log in as Jane, and navigate to the Privacy page, we are going to see an Unauthorized (403) response:
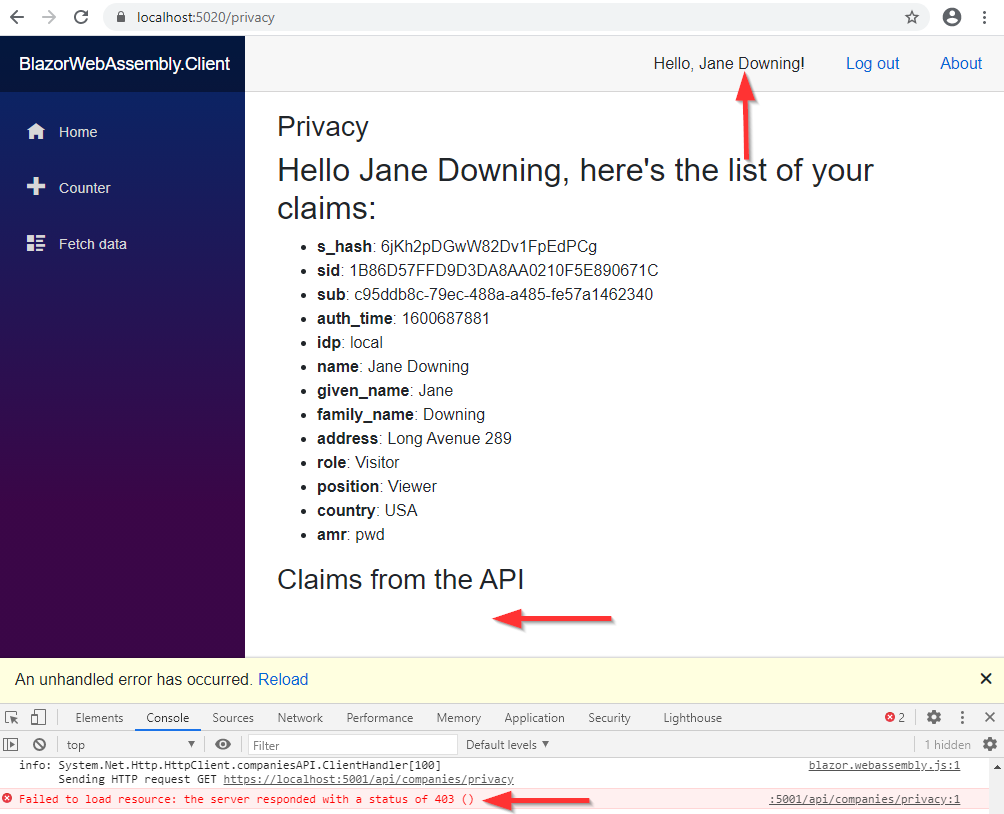
This proves our policy security works like a charm.
Conclusion
In this article, we have learned:
- Differences between Role-based access control and Attribute-based access control
- How to implement Policies to protect our Blazor WebAssembly application
- The way to protect API’s resources with Policies.
So, after all the articles from this series, you should have great knowledge regarding the Blazor WebAssembly authorization with IdentityServer4.
Until the next one.
Best regards.