

In this article, we are going to cover how to develop and publish Angular with an ASP.NET Core backend. Single-Page Application (SPA) frameworks like Angular can be configured with ASP.NET Core to facilitate the development and publishing process. This is particularly useful when there is the need to serve the SPA from the .NET Core backend to allow the flexibility for server-side rendering or server-side prerendering.
Today, we are going to accomplish this by diving into a practical example.
Let’s dive into this article.

The Build Process
First, let’s get a basic knowledge of what we mean by the build process.
Programming languages that target the .NET Core runtime use MSBuild project files (.csproj) to describe and control the application build process. The build process is the process of converting source code into software artifacts (typically DLLs). This is exactly what happens when we run dotnet build. The build process can also be extended to execute those artifacts. This is what happens when we run dotnet run. Additionally, we can also package those artifacts by running dotnet publish.
But that’s just the default behavior.
The .csproj file lets you customize this process. Later on, we are going to see how to publish Angular production files as part of the build process. This can be useful for certain continuous integration or continuous development processes.
Setting up a Frontend and Backend Project
Before we continue, let’s create a new Web API project using the ASP.NET Core CLI. This command will create a weather forecast API:
dotnet new webapi -o BackendProject
Next, let’s create a sample Angular project within the BackendProject folder:
ng new frontend-project
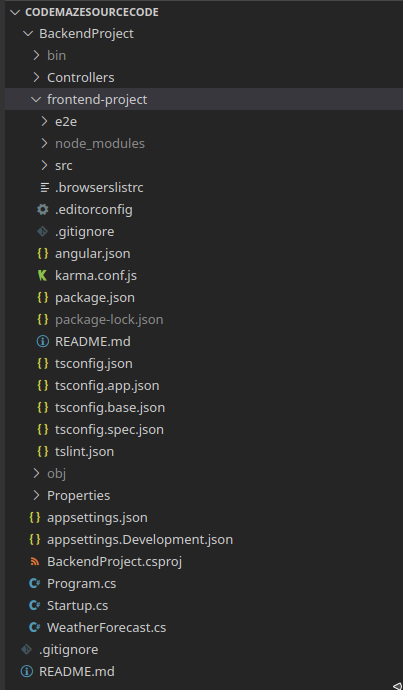
Our project should now have the following project structure:
Now that we have created a frontend and backend project, let’s modify a few files to make sure that the frontend application is communicating with the ASP.NET Core Web API.
First, we need to configure the project with an HTTP client.
Let’s modify app.module.ts:
@NgModule({
  declarations: [
    AppComponent
  ],
  imports: [
    BrowserModule,
    HttpClientModule,
    AppRoutingModule
  ],
  providers: [],
  bootstrap: [AppComponent]
})
export class AppModule { }
Let’s move on by creating weatherForecast.model.ts to define the interface for our API:
export default interface WeatherForecast {
    date: string;
    temperatureC: number;
    temperatureF: number;
    summary: string;
}
Now, we can modify app.component.ts:
import { Component, Inject } from '@angular/core';
import { HttpClient } from '@angular/common/http';
import WeatherForecast from './weatherForecast.model';

@Component({
  selector: 'app-root',
  templateUrl: './app.component.html',
  styleUrls: ['./app.component.scss']
})
export class AppComponent {
  public forecasts: WeatherForecast[];

  constructor(http: HttpClient) {
    http.get<WeatherForecast[]>('https://localhost:5001/' + 'weatherforecast').subscribe(result => {
      this.forecasts = result;
    }, error => console.error(error));
  }
}
In summary, we are performing an API call to the backend when we initialize AppComponent.
After that, let’s rewrite app.component.html:
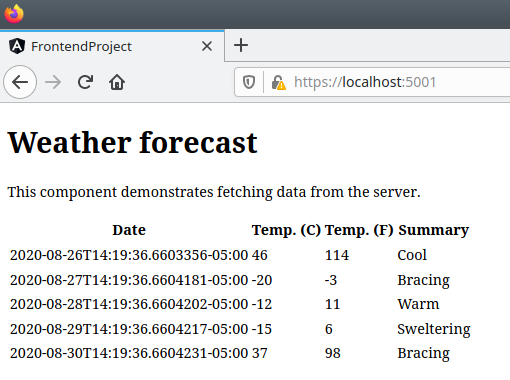
<h1 id="tableLabel">Weather forecast</h1>

<p>This component demonstrates fetching data from the server.</p>

<p *ngIf="!forecasts"><em>Loading...</em></p>

<table class='table table-striped' aria-labelledby="tableLabel" *ngIf="forecasts">
  <thead>
    <tr>
      <th>Date</th>
      <th>Temp. (C)</th>
      <th>Temp. (F)</th>
      <th>Summary</th>
    </tr>
  </thead>
  <tbody>
    <tr *ngFor="let forecast of forecasts">
      <td>{{ forecast.date }}</td>
      <td>{{ forecast.temperatureC }}</td>
      <td>{{ forecast.temperatureF }}</td>
      <td>{{ forecast.summary }}</td>
    </tr>
  </tbody>
</table>

<router-outlet></router-outlet>
Here, we’re rendering the forecast data from the API into HTML.
If you want to know how to connect Angular with ASP.NET Core in more detail, check out our Angular Series.
Lastly, we need to enable a CORS policy on the .NET Core server by modifying the ConfigureServices method and the Configure method within Startup.cs:
public void ConfigureServices(IServiceCollection services)
{
    services.AddCors();
    services.AddControllers();
}

public void Configure(IApplicationBuilder app, IWebHostEnvironment env)
{
    if (env.IsDevelopment())
    {
        app.UseDeveloperExceptionPage();
    }

    app.UseHttpsRedirection();

    app.UseRouting();

    app.UseCors(builder =>
        builder.WithOrigins("http://localhost:4200"));

    app.UseAuthorization();

    app.UseEndpoints(endpoints =>
    {
        endpoints.MapControllers();
    });
}
We can test our sample project by running dotnet run within BackendProject and running npm run start within the frontend-project folder:
Now that we have a working sample project, we can dive into the project file.
The Project File
As we mentioned, we are going to spend most of our time modifying this file. So let’s jump in.
The Property Group
Let’s begin by modifying BackendProject.csproj:
<PropertyGroup>
    <TargetFramework>netcoreapp3.1</TargetFramework>
    <FrontendRoot>frontend-project</FrontendRoot>
</PropertyGroup>
We can use the PropertyGroup to assign values to variables that we can use elsewhere in this file.
Install Angular Dependencies with the Project File
We can add this code to within the Project section:
<Target Name="DebugEnsureNodeEnv" BeforeTargets="Build" Condition=" '$(Configuration)' == 'Debug' And !Exists('$(FrontendRoot)node_modules') ">
    <!-- Ensure Node.js is installed -->
    <Exec Command="node --version" ContinueOnError="true">
      <Output TaskParameter="ExitCode" PropertyName="ErrorCode" />
    </Exec>
    <Error Condition="'$(ErrorCode)' != '0'" Text="Node.js is required to build and run this project. To continue, please install Node.js from https://nodejs.org/, and then restart your command prompt or IDE." />
    <Message Importance="high" Text="Restoring dependencies using 'npm'. This may take several minutes..." />
    <Exec WorkingDirectory="$(FrontendRoot)" Command="npm install" />
  </Target>
First, we are calling this target DebugEnsureNodeEnv. This target can be called anything. This target contains a command that is to be executed before the Build part of the process. In .NET Core, the Build target refers to the part of the build process that transforms source code into executable files.
Additionally, we can add conditions to the target. The DebugEnsureNodeEnv also checks that the configuration value is Debug (the default value) and checks if the node_modules folder exists. If those conditions are not met, the target checks the node version. If the check is successful it installs the NPM packages, otherwise, it spits out an error message.
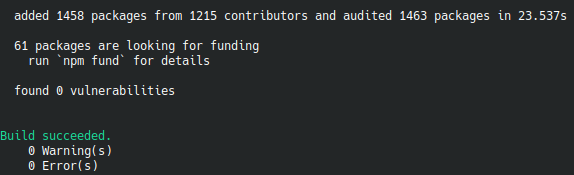
Let’s try our code by deleting the node_modules folder and running dotnet build:
![]()
After a minute or so, we should be able to see the build results:
Publish Angular with the Project File
Now, we are going to move on to the next target. Let’s start by placing this code right underneath the previous target:
<Target Name="PublishAngular" AfterTargets="ComputeFilesToPublish">
    <Exec Command="npm install" WorkingDirectory="$(FrontendRoot)" />
    <Exec Command="npm run build -- --prod" WorkingDirectory="$(FrontendRoot)" />
    <ItemGroup>
      <DistFiles Include="$(FrontendRoot)dist\**" />
      <ResolvedFileToPublish Include="@(DistFiles->'%(FullPath)')" Exclude="@(ResolvedFileToPublish)">
        <RelativePath>%(DistFiles.Identity)</RelativePath>
        <CopyToPublishDirectory>PreserveNewest</CopyToPublishDirectory>
      </ResolvedFileToPublish>
    </ItemGroup>
</Target>
To publish Angular with ASP.NET Core, we must do it after the ComputeFilesToPublish target of the build process. Like the previous target, we also give it a name. This time we are going to call it PublishAngular. This target will run after MSBuild finishes computing and all the files that need to be copied into the publish folder.
This target will install the NPM packages and also build the Angular project. Afterward, we define the DistFiles item to include the dist folder that contains the published Angular SPA. Then the target adds the full path of DistFiles items as ResolvedFileToPublish items unless there is already a ResolvedFileToPublish item with the same identity. This avoids duplicate paths in the publish logic. Lastly, this element also tells the publish logic to use a relative path which we have set to frontend-project/dist and is then copied to the publish folder.
Before we try it out in our demo application, we have to make a few changes to the .NET Core project.
Configuring ASP.NET Core to Serve Angular Files
For this to work properly, we need to go back and modify Startup.cs:
public void ConfigureServices(IServiceCollection services)
{
    services.AddCors();
    services.AddControllers();
    services.AddSpaStaticFiles(configuration =>
    {
        configuration.RootPath = “frontend-project/dist”;
    });
}

public void Configure(IApplicationBuilder app, IWebHostEnvironment env)
{
    if (env.IsDevelopment())
    {
        app.UseDeveloperExceptionPage();
    }

    app.UseHttpsRedirection();

    app.UseStaticFiles();
    if (!env.IsDevelopment())
    {
        app.UseSpaStaticFiles();
    }

    app.UseRouting();

    app.UseCors(builder =>
        builder.WithOrigins("http://localhost:4200"));

    app.UseAuthorization();

    app.UseEndpoints(endpoints =>
    {
        endpoints.MapControllers();
    });
}
The AddSpaStaticFiles method is a service that can provide static files served as a SPA. We need this service only if the files are not generated into the webroot directory (wwwrooot). The UseStaticFiles method enables static files stored in the webroot directory to be served. The UseSpaStaticFiles method enables static files stored in the path indicated by the AddSpaStaticFiles method.
Now, we can run dotnet publish --configuration Release --output ../_Release and then, we can navigate to the _Release folder and check out our output:
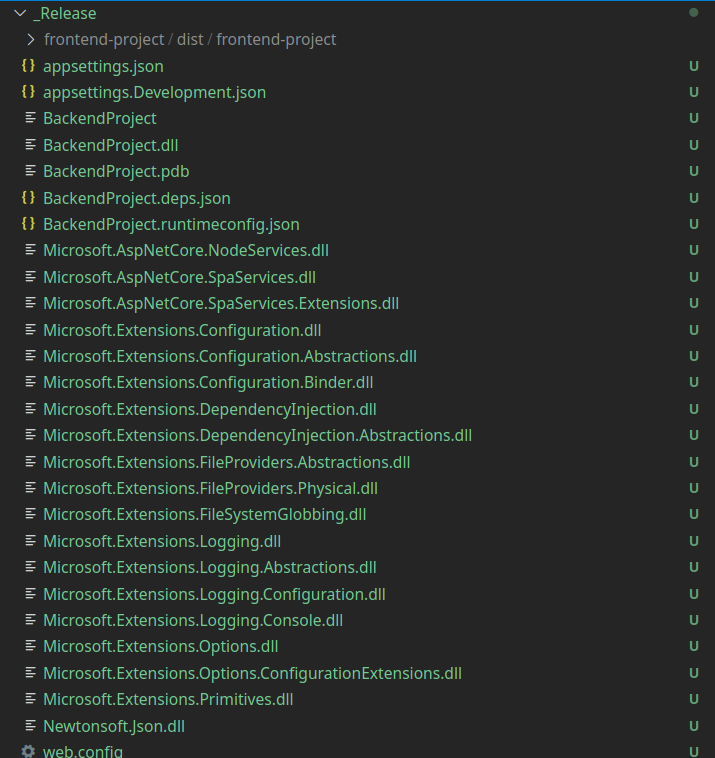
Lastly, let’s see if the Angular static files were published:
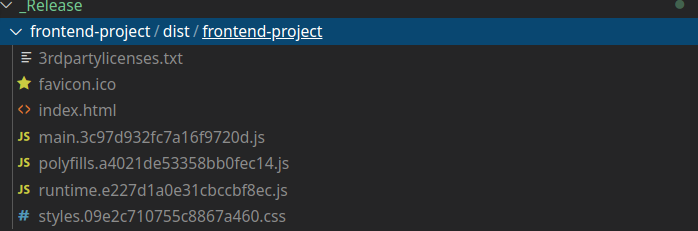
Yup! The _Release folder contains all the published Angular and ASP.NET Core files to deploy a production-ready application!
Configuring for Angular Development
Let’s wrap up this article with one more trick.
By using the namespace Microsoft.AspNetCore.SpaServices.AngularCli and modifying Startup.cs, we can also run the Angular development server by simply running dotnet run:
app.UseSpa(spa =>
{
    spa.Options.SourcePath = "frontend-project";
    if(env.IsDevelopment())
    {
        spa.UseAngularCliServer(npmScript: "start");
    }
});
The UseAngularCliServer lets us choose which npm script to run. In package.json, we defined the start script to execute ng serve which will run the Angular development server. Therefore, when we run the project in the development environment, .NET Core will also run the Angular development server.
After running the project and navigating to https://localhost:5001 we should be able to see our application in development mode with hot module reload enabled:
Conclusion
We have successfully configured our ASP.NET Core project to publish Angular production files. Additionally, we also learned to serve an Angular application both in production and development modes. Although the example we used was with Angular, this can be adapted with other popular SPA frameworks such as React and Vue.
Furthermore, this project can be additionally adapted for server-side rendering for SEO on your website. The techniques learned in this article will also enable you to write flexible build and publishing configurations for whatever CI/CD setup you are working on.
Hi,
thx for your tutorial.
For me the ComputeFilesToPublish does not work.
Npm run build is execuded successfully but the content from the dist folder is not copied to the publish folder.
Do you have an idea?
It’s .net6.0
To be honest, I am not sure. It is a bit older article, using .NET Core 3.1 so I am not sure if something has changed in .NET 6. Just for the curiosity part, have you checked with our source code that you didn’t miss anything by accident?
Thx for your quick reply.
I guess i configured everything right according to the steps descriped above, because the build command is execuded, but it won’t copy anything inside the publish folder
I wanted just to host already build files with IIS, and this tutorial helped. Don’t forget to remove “Microsoft.AspNetCore.SpaProxy” from launchSettings.json if you already tried it using that.
I wanted to point out a mistake in your startup. app.UseCors needs to be AFTER routing but BEFORE UseAuthorization.
Which makes sense because CORS is a cross-cutting concern in your routing but before authorization is applied. Order matters in the pipeline 😉
Yes, that is true. Order does matter. This is our mistake. We even wrote about it here https://code-maze.com/working-with-asp-net-core-middleware/
So I cloned your repo and tried to host it on IIS and I only see the directory files, what would be the URL to see an angular page?
To be honest, I haven’t tested this on IIS. But we have an article that explains exactly that: https://code-maze.com/net-core-web-development-part16/ We will see to test this on IIS as well.
Is it actual for .Net 5?
When we wrote this article, we’ve used the 3.1 version. But I am pretty sure that it applies to .NET 5 as well.
I suppose that ine
<DistFiles Include=”$(FrontendRoot)dist**” />
should be
<DistFiles Include=”$(FrontendRoot)dist\**” />
Yeah, it seems so.
Why not just use
dotnet new angular?That’s one option but it is not the same. There are so many projects with separate client and server projects. I know I prefer it that way.
I do as well. I was just wondering the difference in this case because you are manually adding in everything that that template does.