
Visual Studio 2019 has great support for Docker and Kubernetes. After opening a solution, Dockerfile files and Helm charts can be added from within the Solution Explorer. For simple project, it still can be too complex to work with Helm chats, define deployments and services. Defining a Dockerfile can be avoided as well. With .NET projects, all the information needed to create a docker image can be found in the project file. This is where the Project Tye comes into play – deploy Microservices to Kubernetes with minimal configuration. In this article I’m showing an example creating a .NET Core web application and API service, let it run locally with tye, and deploy it to an Kubernetes cluster.
Project Tye is still in its early stages, currently it’s an open source experiment which lasts at least until Nov 2020. Looking how’s behind it with Ryan Nowak (Dev/Architect on ASP.NET Core+Blazor) and David Fowler, the creator of SignalR, this looks very promising and exciting!

Preparations
To get started, you need to have the .NET Core 3.1 SDK, the Docker Desktop, and Project Tye installed.
.NET Core SDK
The sample application is built using .NET Core 3.1. The SDK can be installed from the dot.net website.
Docker Desktop
To run docker on the local Windows system, the Docker Desktop can be installed. Docker makes use of a HyperV image, or you can use WSL-2 (which requires at least Windows build 19018+). With WSL-2, Docker can make use of the Windows Subsystem for Linux.
Tye
The Tye CLI can be installed with the dotnet CLI:
dotnet tool install -g Microsoft.Tye
Because the latest version of this tool is not released yet, you need to supply the version number. Running this tool without a version number lists the version number that is available, thus you can get the version number from the output and use it to install the tool, e.g.
dotnet tool install -g Microsoft.Tye --verson "0.2.0-alpha.20258.3"
To see the current version installed, use
tye --version
Azure CLI
With this sample I’m using the Azure Kubernetes Service and the Azure Container Registry, so the Azure CLI is needed as well: Install Azure CLI on Windows.
See Getting Started for more information.
.NET Core Projects
For the sample application, at first, I’m creating a solution using the dotnet CLI. The solution consists of a .NET Standard library with shared code, an ASP.NET Core Web API application offering a books service, and a Web Application using Razor Pages. A solution file is added, and dependencies between the projects added:
dotnet new classlib -o Books.Shared
dotnet new api -o BooksAPI
dotnet new webapp -o BooksApp
dotnet new sln
dotnet sln add Books.Shared
dotnet sln add BooksAPI
dotnet sln add BooksApp
dotnet add BooksAPI reference Books.Shared
dotnet add BooksApp reference Books.Shared
I would have named the projects with a dot in between, e.g. Books.API. However, there´s a current issue with such naming but I expect this to be resolved soon. Changing the name of the docker image in the tye file would be a temporary solution, but I want to show using tye with as little configuration as possible.
Library
With the library, the entity type Book is defined. This should just demonstrate the use of a library with tye.
public class Book
{
    public int BookId { get; set; }
    public string Title { get; set; } = string.Empty;
    public string? Publisher { get; set; }
}
Web API
The Web API is a project to return a list of books. For this, the BooksService class is defined. This class returns a list of books with the GetBooks method:
public class BooksService
{
    private readonly ILogger _logger;

    public BooksService(ILogger<BooksService> logger)
        => _logger = logger;

    private List<Book> _books = new List<Book>()
    {
        new Book { BookId = 1, Title = "Professional C# 7 and .NET Core 3", Publisher = "Wrox Press"},
        new Book { BookId = 2, Title = "Professional C# 9 and .NET 5", Publisher = "Wrox Press"}
    };

    public IEnumerable<Book> GetBooks()
    {
        _logger.LogTrace("GetBooks invoked");
        return _books;
    }
}
The BooksService class is injected in the constructor of the BooksController, and a JSON result is returned from the GetBooks method:
[ApiController]
[Route("api/[controller]")]
public class BooksController : ControllerBase
{
    private readonly BooksService _booksService;
    public BooksController(BooksService booksService)
        => _booksService = booksService;

    [HttpGet]
    public IActionResult GetBooks()
        => Ok(_booksService.GetBooks());
}
In the Startup class, the BooksService class is configured in the dependency injection container:
public void ConfigureServices(IServiceCollection services)
{
    services.AddControllers();
    services.AddSingleton<BooksService>();
}
Web Application
The ASP.NET Core Web application calls into the API service. For this, the BooksClient class is defined. This class receives an object of type HttpClient in the constructor, and sends a HTTP GET request to the API service to received books. The received JSON information is serialized with the new System.Text.Json.JsonSerializer – similar to the API backend where this serializer is the default for ASP.NET Core. To transfer the lowercase JSON into the uppercase properties of the Book class:
public class BooksClient
{
    private readonly HttpClient _httpClient;
    private readonly JsonSerializerOptions serializerOptions = new JsonSerializerOptions
    {
        PropertyNameCaseInsensitive = true,
        PropertyNamingPolicy = JsonNamingPolicy.CamelCase
    };

    public BooksClient(HttpClient httpClient)
        => _httpClient = httpClient;

    public async Task<Book[]> GetBooksAsync()
    {
        var response = await _httpClient.GetAsync("/api/Books");
        var stream = await response.Content.ReadAsStreamAsync();
        return await JsonSerializer.DeserializeAsync<Book[]>(stream, serializerOptions);
    }
}
The dependency injection container is configured with the Startup class. The HTTP Client Factory is used to configure the BooksClient class that gets the HttpClient class injected. With the HTTP Client Factory, the HttpClient is configured to set the base address of the Books Web API. GetServiceUri is an extension method to extend the IConfiguration interface to get based on the name of the service the host and port number for the service. Starting tye, environmental variables with the name service:{name}:host and service:{name}:port are configured, and GetServiceUri can be used to easily connect these values to return a URL. For using this API, the NuGet package Microsoft.Tye.Extensions.Configuration need to be referenced.
public void ConfigureServices(IServiceCollection services)
{
    services.AddRazorPages();

    services.AddHttpClient<BooksClient>(client =>
    {
        client.BaseAddress = Configuration.GetServiceUri("booksapi");
    });
}
One feature of Project Tye is service discovery which can be used optionally. With the service discovery goals of tye, it’s recommended to avoid hardcoding of URIs/Addresses in application code. Service discovery can be used via configuration – this way deploying to different environments is easy.
The Razor page Books.cshtml displays a book list in a HTML table:
@page
@model Books.App.Pages.BooksModel
@{
    ViewData["Title"] = "Books";
}

<h1>Books</h1>

<table class="table">
    <thead>
        <tr>
            <th>Id</th>
            <th>Title</th>
            <th>Publisher</th>
        </tr>
    </thead>
    <tbody>
        @foreach (var book in @Model.Books!)
        {
            <tr>
                <td>@book.BookId</td>
                <td>@book.Title</td>
                <td>@book.Publisher</td>
            </tr>
        }
    </tbody>
</table>
With the code-behind file BooksModel, the BooksClient class is injected to retrieve the book list:
public class BooksModel : PageModel
{
    public Book[]? Books { get; set; }

    public async Task OnGet([FromServices] BooksClient booksClient)
    {
        Books = await booksClient.GetBooksAsync();
    }
}
Now it’s time to run tye!
Using Tye locally
To start with tye, in the folder of the solution, the command
tye init
can be used to create a tye application configuration file. Tye uses YAML, similar to the Helm charts. The configuration file contains the name of the solution, as well as the projects the tye command found for deployment – which are the Web API and the Web Application – and references the project files:
# tye application configuration file
# read all about it at https://github.com/dotnet/tye
#
# when you've given us a try, we'd love to know what you think:
#    https://aka.ms/AA7q20u
#
name: tyesample
services:
- name: booksapi
  project: BooksAPI/BooksAPI.csproj
- name: booksapp
  project: BooksApp/BooksApp.csproj
Having the tye application configuration file, the docker images can be built using
tye build.
You can see the images built with the docker CLI, using
docker images
With output such as
REPOSITORY                             TAG                 IMAGE ID            CREATED             SIZE
booksapp                              1.0.0               f1b7c024bc8d        3 hours ago         232MB
booksapi                              1.0.0               4184fffeb7f6        3 hours ago         208MB
mcr.microsoft.com/dotnet/core/aspnet   3.1                 79e79777c3bf        2 weeks ago         207MB
With this, it’s possible to run the application locally. You just need to start
tye run
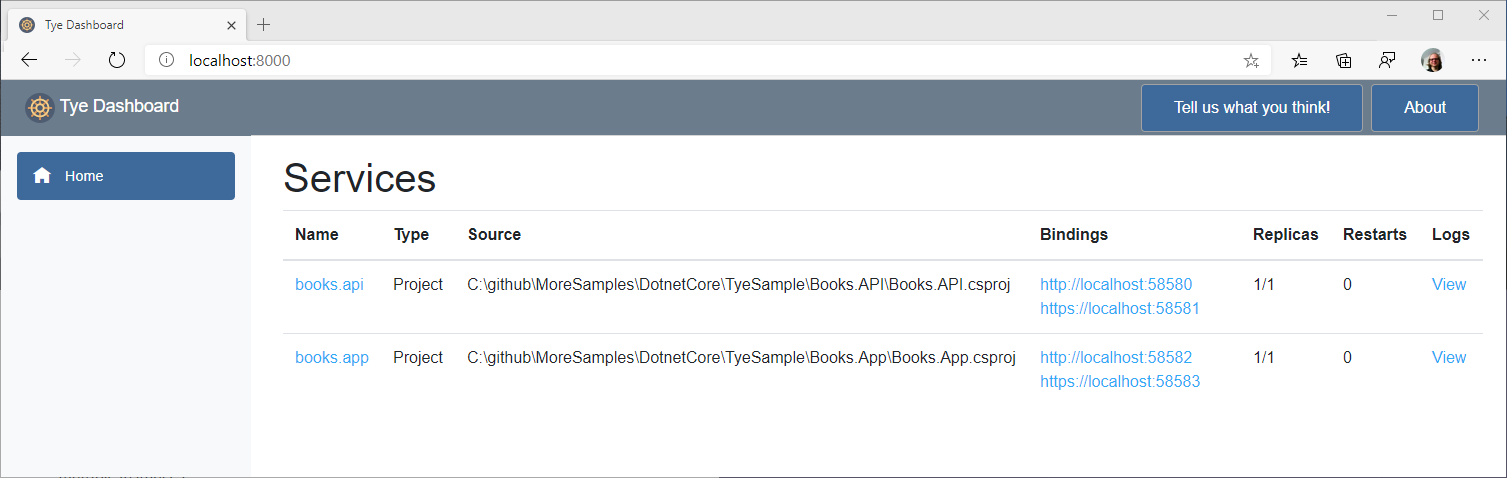
Then you can open the Tye dashboard at http://127.0.0.1:8000. With the dashboard you can see the number of replicas and restarts, the bindings to the services, and have access to the logs and metrics:
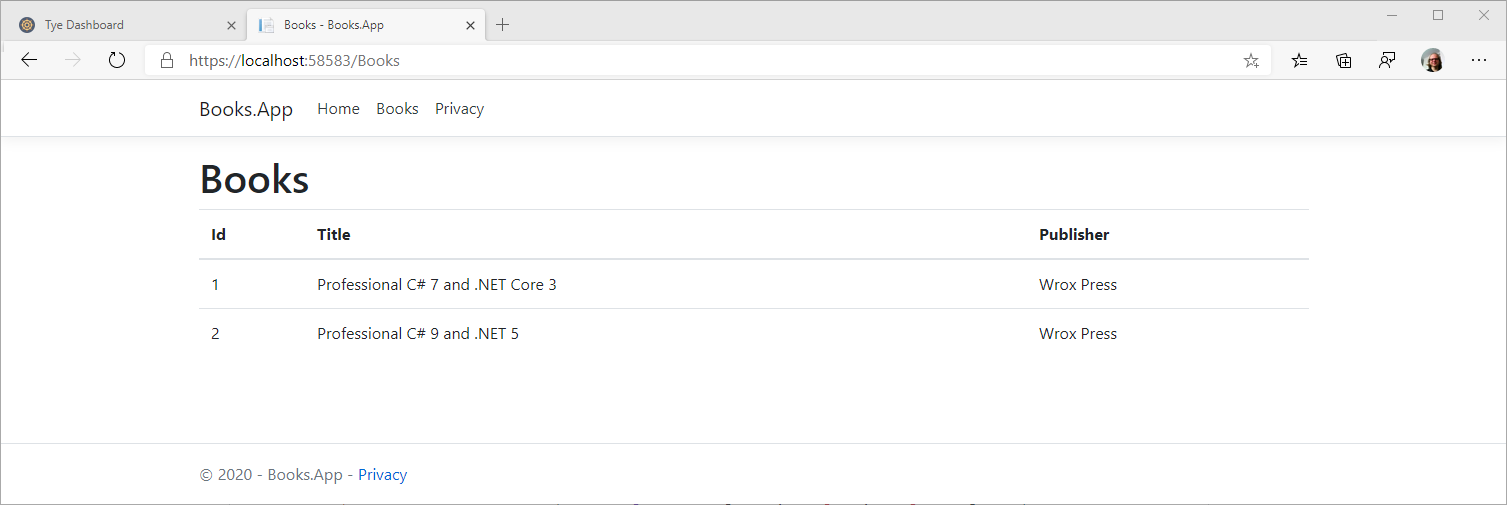
Accessing the Books page, books are returned:
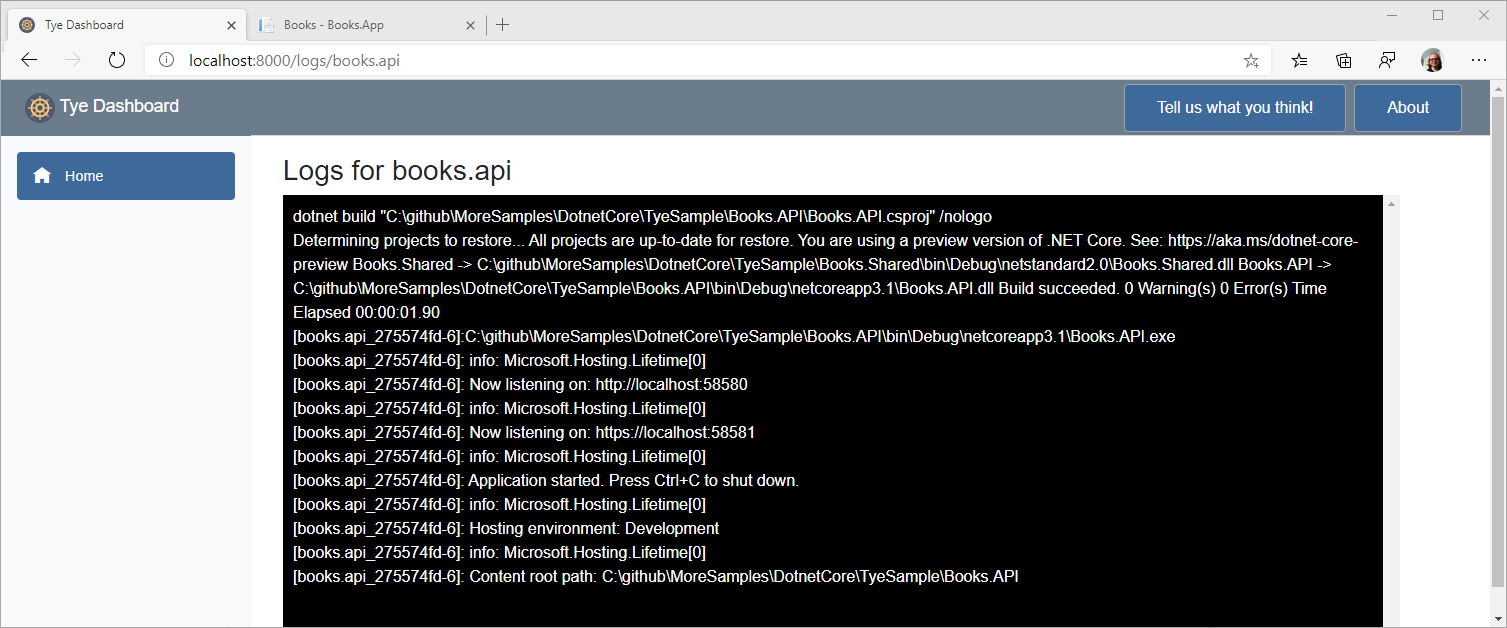
It’s easy to look at log information from the different services:
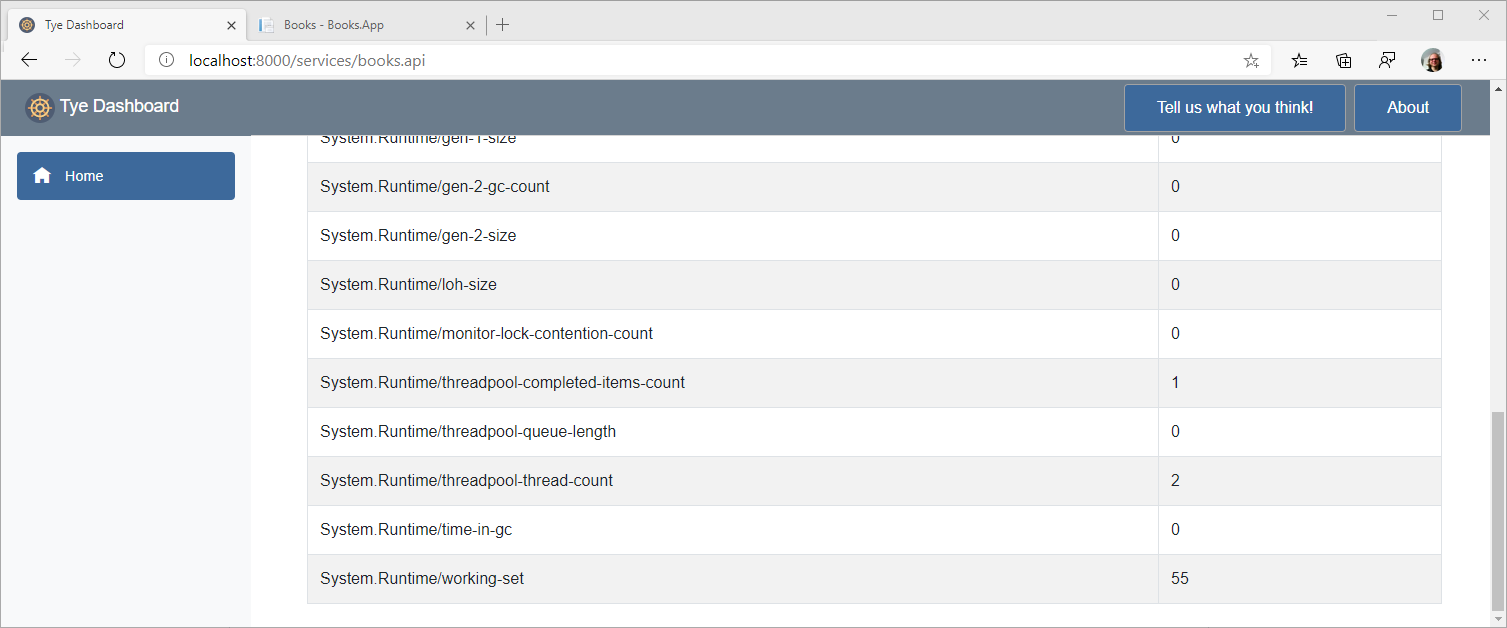
Tye also gives access to metric information:
If not necessary, tye does not run the application locally via docker containers. Running the application it’s not required to build the docker images first.
Deploying using Tye
Next, we can deploy the solution to a Kubernetes cluster. If you already know working with Helm charts, creating yaml deployment and service files, you’ll see that the steps are now extremly easy.
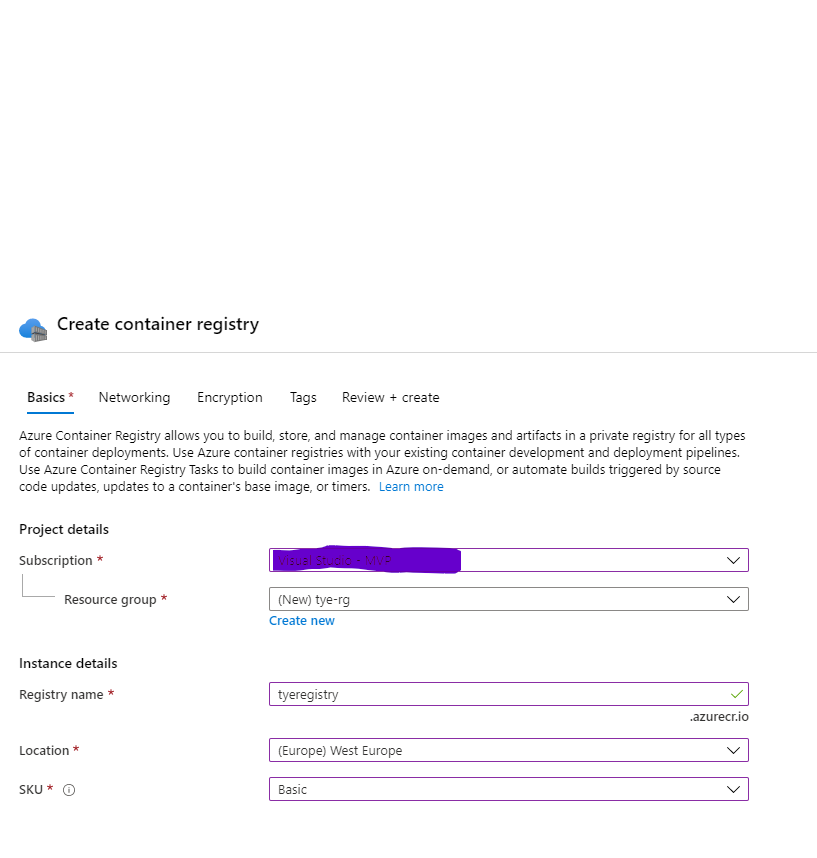
You can enable Kubernetes on Docker Desktop, or use different options for a Kubernetes cluster. Here, I’m creating an Azure Kubernetes Service (AKS) and a Azure Container Registry (ACR) to deploy the images. First, the images will be pushed to the ACR, and then the cluster pulls the images from there.
First, I create the ACR with the Azure Portal:
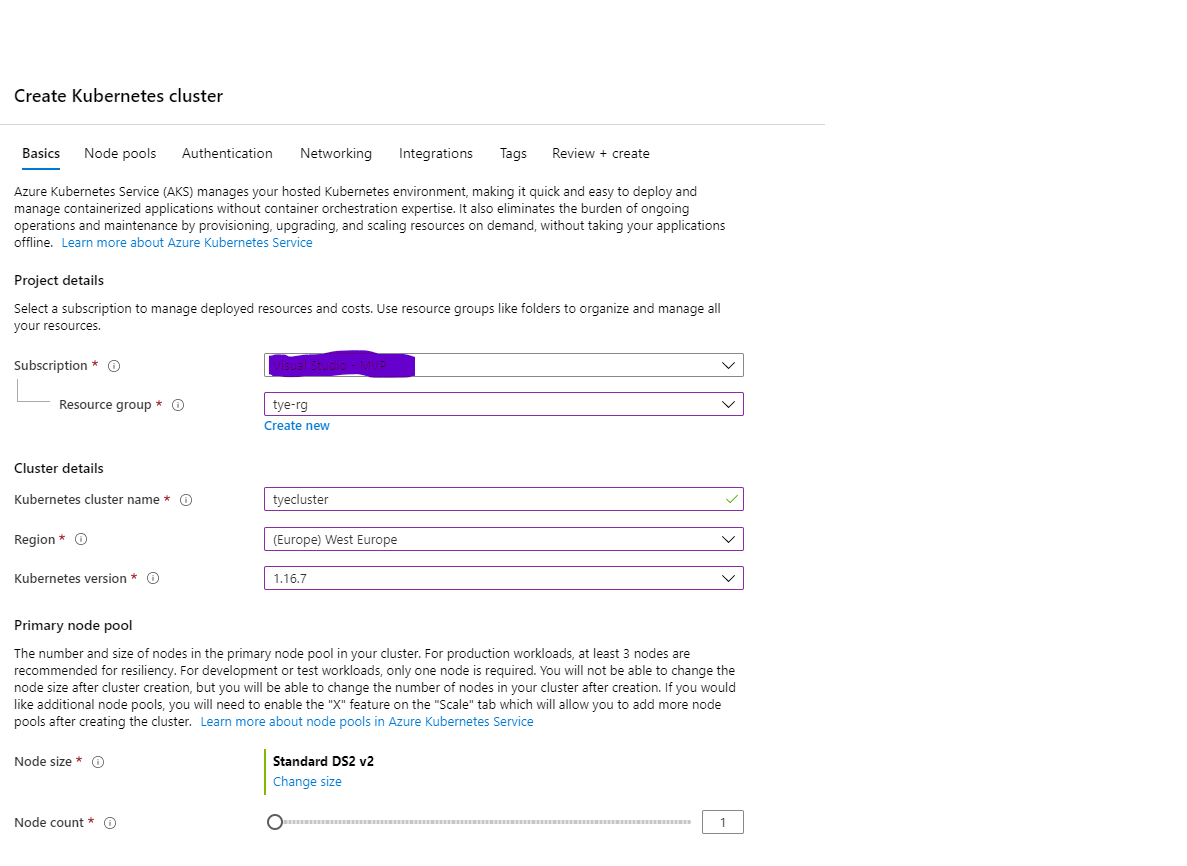
Next, the AKS is created with a single node to stay cheap:
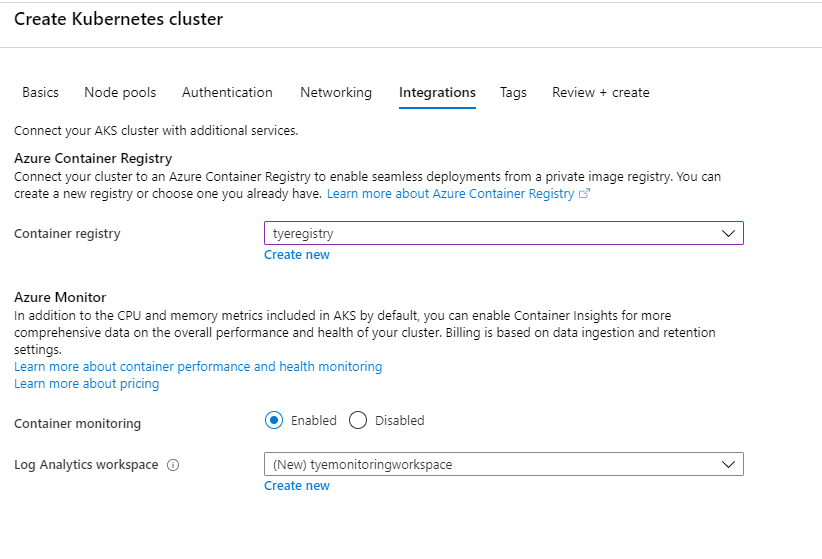
Before clicking the final Create button, the ACR can be associated to the AKS with the Integrations tab:
It takes a few minutes to create the Azure Kubernetes Service. It takes much more time to create a Kubernetes cluster on-premises!
After the cluster is created, the kubectl command needs to be associated with the cluster. This can be done using the Azure CLI:
az aks get-credentials --resource-group {resource-group} --name {cluster-name}
In case the cluster is not associated with the Azure Container Registry on creation of the cluster, it can be associated using the Azure CLI:
az aks update –name {cluster-name} –resource-group {resource-group} –attach-acr {container-registry}
The configuration for the kubectl command can be cound in the .kube folder from the users folder. The kubectl command connects to the cluster defined with the configuration.
To start deployment,
tye deploy --interactive
can be used. In the interactive mode, you’re asked for the link to the Azure Container Registry. From there, this happens:
- Docker images are built
- Docker images are pushed to the registry
- Docker images are pulled from the Kubernetes cluster
- For every project, Deployments and Service definitions are created
- The Deployments and Services are applied to the Kubernetes cluster
In case authentication with the ACR fails, login can help:
az acr login --name {registry}
To see the running pods in the cluster, you can use
kubectl get pods
which gives a result like this:
NAME                        READY   STATUS    RESTARTS   AGE
booksapi-7d4b96c6bb-vxv64   1/1     Running   0          29m
booksapp-764d98f56-rndsw    1/1     Running   0          7m9s
To see all the services, use
kubectl get service
NAME         TYPE        CLUSTER-IP     EXTERNAL-IP   PORT(S)   AGE
booksapi     ClusterIP   10.0.207.102   <none>        80/TCP    23m
booksapp     ClusterIP   10.0.164.169   <none>        80/TCP    23m
kubernetes   ClusterIP   10.0.0.1       <none>        443/TCP   4h27m
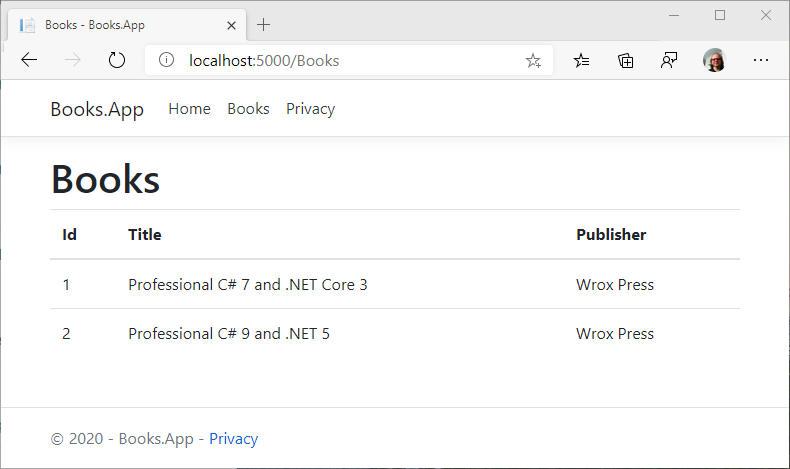
To access the Web application from localhost, the port can be forwarded to localhost:
kubectl port-forward svc/booksapp 5000:80
Opening a browser to access http://localhost:5000, the Books page is shown accessing the API behind the scenes:
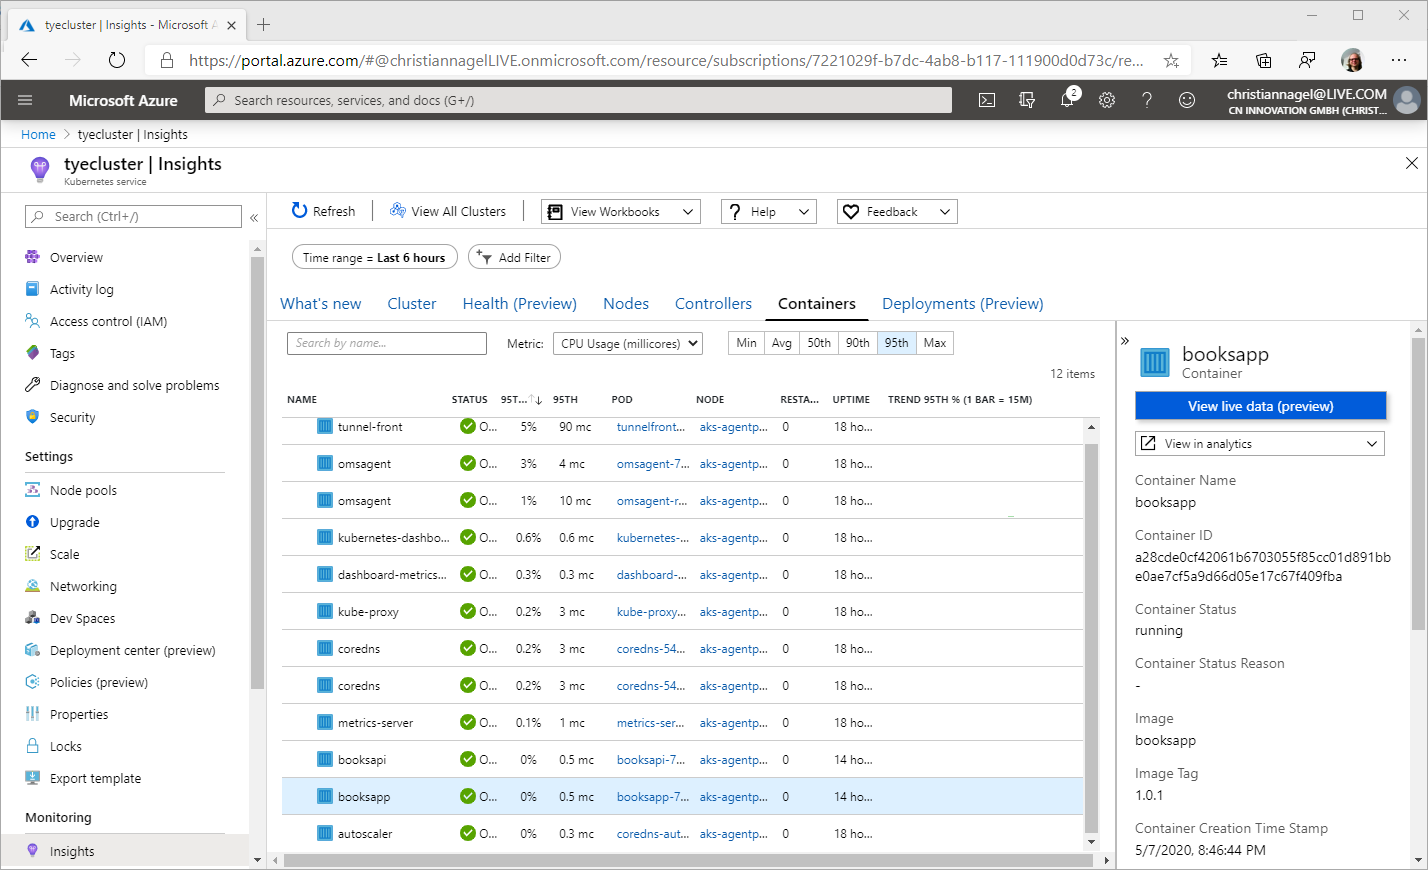
Using the Azure Portal, with monitoring enabled you can access information about resources used by the cluster, information about nodes, controllers, containers, and deployments.
Take away
With Project Tye it’s easy to create a deployment to an Kubernetes cluster from a .NET solution. Base images needed to build docker images are mapped from the project dependencies, services are found using the service discovery feature, YAML files to define the deployments and services are not needed. A simple tye deploy creates docker images, and pushes the images to the container registry, and uploads the images with the Kubernetes cluster including all the required configuration including Deployments and Services.
If you’ve read this far, consider buying me a coffee which helps me staying up longer and writing more articles.

You can get the complete sample code.
Enjoy learning and programming!
Christian
Links
HTTP Client Factory with .NET Core
More information on C# and programming .NET Core applications is in my book Professional C# 7 and .NET Core 2.0, and in my workshops.
Flying Whale, Peace, Hope, Inspiration ID 91115509 © Wisconinart | Dreamstime.com

2 thoughts on “Project Tye – easier development with .NET for Kubernetes”