
ASP.NET Core Identity 实战(3)认证过程
如果你没接触过旧版Asp.Net Mvc中的 Authorize 或者 Cookie登陆,那么你一定会疑惑 认证这个名词,这太正式了,这到底代表这什么?
获取资源之前得先过两道关卡Authentication & Authorization
要想了解Identity中用户登录之后,后续的访问时怎样识别用户的,那首先我们得了解下认证(Authentication) 和授权(Authorization)的含义
Authentication
Authentication就是认证的意思,还举之前公园的例子,我们拿到门票之后,去公园,入口门卫A首先要根据门票确认我们是谁?是老王,还是老赵,门票是不是真的,过期没。这个过程,这个识别来访者是谁的过程就叫做Authentication(身份认证过程)
那Authorization 又是啥?
这两个单词太像了,甚至他们的释义都很像,以至于我们在不了解他们的时候总是弄混他们,Authorization是授权的意思,上一小节中,门卫A识别出了我们是谁?Ok,我们是老李,那么门卫B能不能让我们进园呢?不一定,门卫B还要再看,门票过期没,上一步已经看过门票是否过期了,为什么还要看呢?事情是这样的:门卫A看到门票过期了,然后在门票副卡上写上“门票过期”四个大字,再写上“认证失败”,但是负责认证的门卫A没有拦着我们,而是继续让我们前进,因为动物园可能因为活动而允许过期门票进入,或者没有门票也可以,那么接下来授权的人门卫B来看门票,他根据动物园切实的情况看,看看许可范围,再问问后台这个人是不是动物园的管理员。经过种种校验,发现,虽然门票过期了,但是今天是开放日,没门票也行,但是我们是普通游客,却来到了管理员通道,所以没让我们进园——授权失败
小结
好了,这就是认证和授权(Authentication & Authorization),两个不同的事,由两个不同的人(或者组件)来做
- 认证用来确认来者是谁,确认身份(确认之后可能没有身份)
- 授权用来确认持有此身份的来者能不能访问当前请求的资源
现在,我们要记住认证与授权中的一个要点
认证只确定用户是谁即使认证失败,也不会拦截用户访问,拦截用户访问发生在授权阶段
另外要注意的是 Authentication和Authorization并不属于Identity的一部分,都不属于Identity,它和Identity是相互独立的,然后一起协作。也就是说,即便我们没有使用Identity ,我们有我们自己的用户存储,角色等等和身份权限相关的一切,那么我们可以将我们的成员系统完美的与Asp.Net Core 进行集成,我们可以假设,Identity就是我们写的,然后将其与Asp.Net Core进行集成
那么为什么要将这个与Identity无关的认证过程Authentication放在这里呢?因为它们是协作的 Authentication和Authorization本事就是要与成员系统协作的,在代码上,他们解耦并且独立,但是在事实逻辑上,成员系统和认证授权总是一起使用的,所以一起讲容易理解
那么这篇文章只讲 Authentication与Authorization中的第一个 —— Authentication,先来了解一下,asp.net core 是怎样知道我们已经登陆的访客是谁的
身份认证中间件 Authentication Middleware
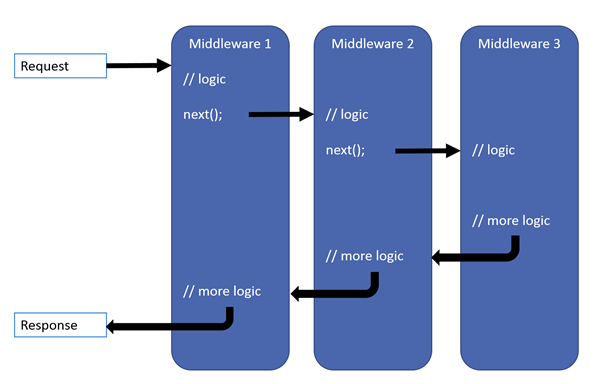
中间件(Middleware)讲起来又是一个长长的故事,如果你完全没概念,那么我建议你先简单学习一下asp.net core 中的中间件,你只要知道它的运行原理即可
在一般的asp.net core web 项目中,我们一般把身份认证中间件放在 静态文件中间件之后,Mvc中间件之前
public void Configure(IApplicationBuilder app, IHostingEnvironment env)
{
    app.UseStaticFiles();
    app.UseAuthentication();
    app.UseMvc(routes =>
    {
        //略...
    });
}
这样做的目的很简单,仅对需要认证的部分做认证
在http请求到达 mvc中间件之前,也就是进入我们写的逻辑代码之前,身份认证就结束了,也就是说,身份认证不能在 controller action中控制
我们用一张图来简化发生在身份认证中间件中的认证过程,注意,这里马上要引入一个新的概念
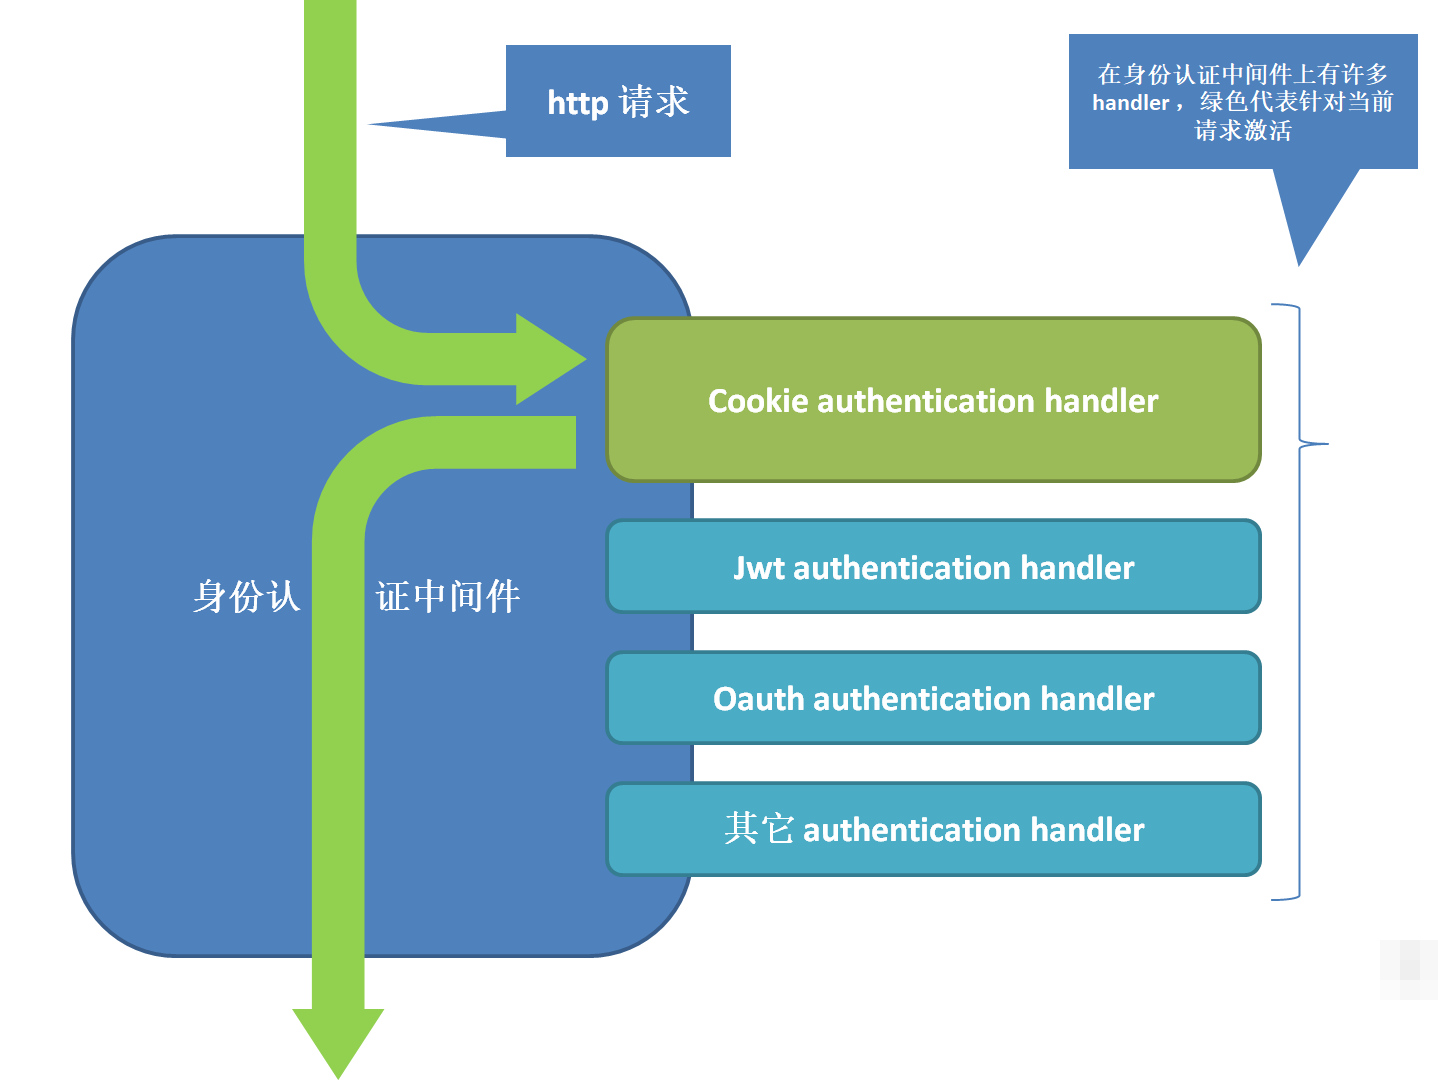
身份认证 handler
中间件是嵌在中间件管道中的一个一个模块,http请求有条件的流经他们
另一个相似的东西,有很多 handler 嵌在身份认证中间件上,那么http是流经所有的handler吗?
Authentication Handler
Authentication Hander 顾名思义,他就是切实处理身份认证的组件,它附加在 authentication middleware 上,在请求到来时, middleware 会在所有附加在它之上的handler中选取一个用来做身份认证
那么当我们使用Identity时,哪些 authentication handler 被附加了呢?当请求到来时,authentication middleware 如何知道要选择哪个handler呢?
接下来,我们一一解答
Cookie Authentication Handler
Identity只添加了一种类型的 handler ——CookieAuthenticationHandler
在我们的StartUp类中的ConfigureServices方法中,我们添加了Identity的Service
services.AddIdentity<ApplicationUser, IdentityRole>()
    .AddEntityFrameworkStores<ApplicationDbContext>()
    .AddDefaultTokenProviders();
但事情没这么简单,在添加Identity的同时,Identity还未我们的项目添加了AuthenticationService和CookieAuthenticationHandler
public static IdentityBuilder AddIdentity<TUser, TRole>(
{
    // Services used by identity
    services.AddAuthentication(options =>
    {
        options.DefaultAuthenticateScheme = IdentityConstants.ApplicationScheme;
        // 略...
    })
    .AddCookie(IdentityConstants.ApplicationScheme, o =>
    {
    // 略...
在services.AddAuthentication的内部添加了AuthenticationService
namespace Microsoft.Extensions.DependencyInjection
{
    public static class AuthenticationCoreServiceCollectionExtensions
    {
         public static IServiceCollection AddAuthenticationCore(this IServiceCollection services)
        {
            services.TryAddScoped<IAuthenticationService, AuthenticationService>();
            services.TryAddScoped<IAuthenticationHandlerProvider, AuthenticationHandlerProvider>();
            services.TryAddSingleton<IAuthenticationSchemeProvider, AuthenticationSchemeProvider>();
注意上面代码的最后三行,后面涉及到他们的获取,他们就是在此处添加的
namespace Microsoft.Extensions.DependencyInjection
{
    public static class CookieExtensions
    {
        public static AuthenticationBuilder AddCookie(this AuthenticationBuilder builder, string authenticationScheme, string displayName, Action<CookieAuthenticationOptions> configureOptions)
        {
            builder.Services.TryAddEnumerable(ServiceDescriptor.Singleton<IPostConfigureOptions<CookieAuthenticationOptions>, PostConfigureCookieAuthenticationOptions>());
            return builder.AddScheme<CookieAuthenticationOptions, CookieAuthenticationHandler>(authenticationScheme, displayName, configureOptions);
上方的代码添加了 CookieAuthenticationHandler
在添加Authentication service的同时,制定默认的 authentication scheme(这个概念在之前的文章中提到过,如果你还有印象的话) 是谁(就是下方的cookie authentication handler)
这时候另一个问题浮现了,只添加了一个 cookie authentication handler,为什么还要将他制定成默认值,是否有有点多此一举呢?
虽然Identity只添加了一种类型的 handler(cookie authentication handler),但是他同时添加了多个
在 authentication 中间件上,区分各个handler的方法是指定不同的 authentication scheme,而不是通过 handler 的类型
其实它添加了这么多:
services.AddAuthentication(options =>
{
    options.DefaultAuthenticateScheme = IdentityConstants.ApplicationScheme;
    options.DefaultChallengeScheme = IdentityConstants.ApplicationScheme;
    options.DefaultSignInScheme = IdentityConstants.ExternalScheme;
})
.AddCookie(IdentityConstants.ApplicationScheme, 略)
.AddCookie(IdentityConstants.ExternalScheme, 略)
.AddCookie(IdentityConstants.TwoFactorRememberMeScheme, 略)
.AddCookie(IdentityConstants.TwoFactorUserIdScheme,略);
不过我们暂时不用关心这些是什么
目前为止我们已经知道了这样几件事:
-
添加Identity时,Identity添加了用于身份认证的服务,以及默认激活的用于认证的handler——
CookieAuthenticationHandler -
Identity的身份认证基于cookie (上篇文章我们了解到 Identity在登陆时将票据加密写入了cookie)
-
所以用户登录后再次访问的时候,会通过cookie来识别当前用户是谁
动手实践
这一小节中我们先编写测试代码,来看看认证过程产生了哪些结果
创建一个名为TestAuthController的控制器,代码大致如下:
namespace IdentityInAction.Controllers
{
    public class TestAuthController : Controller
    {
        public IActionResult Index()
        {
            return Json(new
            {
                User.Identity.IsAuthenticated,
                User.Identity.AuthenticationType,
                Claims=User.Claims.Select(c => new { c.Type, c.Value })
                // 略...
这些代码将返回一个json字符串,内容是 authentication的部分结果和用户的claims信息,这三行核心代码的意思分别是:
- 用户是否已经通过身份认证
- 对次请求进行认证的handler的名称(在上篇文章中我们有提到 authentication scheme 就是 authentication type的另一个名字,记住这件事对我们的理解很有帮助)
- 这个用户的Claims信息
运行程序,不要进行登陆,如果已经登陆了则退出登陆,退出登陆的链接是右上角的LogOut
然后访问http://localhost:{你的端口}/testauth/index,得到的结果如下:
{
  "isAuthenticated": false,
  "authenticationType": null,
  "claims": []
}
由于没有用户登陆,所以结果里几乎什么都没有,然后再尝试登陆后再次访问这个地址,结果如下:
{
  "isAuthenticated": true,
  "authenticationType": "Identity.Application",
  "claims": [
    {
      "type": "http://schemas.xmlsoap.org/ws/2005/05/identity/claims/nameidentifier",
      "value": "78a032c7-0d67-4cec-b031-2d15a7bac755"
    },
    {
      "type": "http://schemas.xmlsoap.org/ws/2005/05/identity/claims/name",
      "value": "abc@abc.com"
    },
    {
      "type": "AspNet.Identity.SecurityStamp",
      "value": "babbb46b-6ba0-4b87-875a-92088197dfbf"
    }
  ]
}
"isAuthenticated": true 这代表认证成功
"authenticationType": "Identity.Application"这是对该请求进行认证的handler的名字,由前文我们知道,我们默认的handler是名为IdentityConstants.ApplicationScheme的cookie handler,我们看一小段源代码证实一下:
public class IdentityConstants
{
    private static readonly string CookiePrefix = "Identity";
    public static readonly string ApplicationScheme = CookiePrefix + ".Application";
正如所料,接下来就是claims了,再上篇文章中提到再登陆过程中加入到Identity的claims有这些:
- UserName |
http://schemas.xmlsoap.org/ws/2005/05/identity/claims/nameidentifier - UserId|
http://schemas.xmlsoap.org/ws/2005/05/identity/claims/name - SecurityStamp(如果支持的话)|
AspNet.Identity.SecurityStamp - 存储在数据库中的额外Claims(如果支持的话)(注:支持,但当前用户没有)
这些claims随着票据一起加密写到了cookie中,现在他们又随着cookie一起传了回来
要注意的是,即便我们退出登陆后没有身份认证失败了,但是我们仍然获得了这个Uri的访问权限,原因在于认证并不阻止用户,授权才会阻止用户,而我们没又做授权方面的限制
看到这里,我们的认证过程的大体已经清楚了,接下来我们要看下整个认证过程的一点细节,整个过程是自上而下的,看标题为工作的那一列
| 工作 | 注释 |
|---|---|
| 获取IAuthenticationHandlerProvider的实例 | |
| 获取默认的AuthenticationScheme | |
| 使用上一步的scheme获取IAuthenticationService实例 | |
| 上一步的service通过第一步的IAuthenticationHandlerProvider获取handler | handler 是 cookie authentication handler |
| handler 调用 AuthenticateAsync,这个方法最终调用了handler的HandleAuthenticateAsync① | 这个方法是事实上执行认证的方法 |
| 获取 CookieAuthenticationOptions.Cookie.Name指定的存储票据的cookie的原始字符串 | 这个Name的默认值是`.AspNetCore.Identity.Application` |
| 解密cookie字符串获得AuthenticationTicket的实例 | |
| 检查是否使用了session存储,如果有则验证是否存在对应的session | |
| 检查cookie 是否过期 | |
| 检查是否需要刷新cookie | |
| 创建新的AuthenticationTicket | |
| 将AuthenticationTicket中的Principal设置到HttpContext.User上,认证结束 | 在动手做一节中,我们使用的User就是在这个时候被赋值的 |
需要注意
① 谁进行的验证
Identity的实现比较复杂,兜兜转转最终的验证时由 cookie authentication handler 的 HandleAuthenticateAsync完成的,如果你在看Identity源代码的话,那么直接跳转到这里可以节省时间
怎么验证的
事实上,说的简单一点,就是在登陆的时候,把票据加密写到cookie里,验证的时候
获取cookie >解密 >还原成票据 >把票据塞到http context中
即使是认证失败了,也是这4个步骤,最终 负责授权的组件会检查 http context 中的票据,还会结合其它情况来确定是否允许当前的请求继续进行下去,而我们的逻辑代码中也可以查看票据,根据不同的 认证结果 返回不同的数据
最后我们贴上AuthenticationService的AuthenticateAsync源代码,这写代码就是上方表格所对应的代码,但是我们要注意到,表格中的内容还包含这份代码所调用的其它代码的步骤
    public virtual async Task<AuthenticateResult> AuthenticateAsync(HttpContext context, string scheme)
    {
        if (scheme == null)
        {
            var defaultScheme = await Schemes.GetDefaultAuthenticateSchemeAsync();
            scheme = defaultScheme?.Name;
            if (scheme == null)
            {
                throw new InvalidOperationException($"No authenticationScheme was specified, and there was no DefaultAuthenticateScheme found.");
            }
        }

        var handler = await Handlers.GetHandlerAsync(context, scheme);
        if (handler == null)
        {
            throw await CreateMissingHandlerException(scheme);
        }

        var result = await handler.AuthenticateAsync();
        if (result != null && result.Succeeded)
        {
            var transformed = await Transform.TransformAsync(result.Principal);
            return AuthenticateResult.Success(new AuthenticationTicket(transformed, result.Properties, result.Ticket.AuthenticationScheme));
        }
        return result;
    }
全文完
你还可以【关注我】,我会经常更新博客的 ;D
