旧 WCF 项目成功迁移到 asp.net core web api
背景
接上一篇,放弃了 asp.net core + gRPC 的方案后,我灵光一闪,为什么不用 web api 呢?不也是 asp.net core 的吗?虽然 RESTful 不是强约束,客户端写起来也麻烦,但还是可以满足基本需求,避免大幅修改旧有的业务逻辑代码。
在网上找到相当多的文章,比较 gRPC 和 RESTful 的优缺点,结论都是 gRPC 推荐用作内部系统间调用, RESTful 推荐用作对外开放接口。
选择 RESTful 另一个最重要的原因是,gRPC 的底层框架需要HTTP2,而 win7 不支持HTTP2,有相当一部分用户在 win7 上。上篇有人推荐 grpc web ,由于项目是 WPF 桌面客户端,这种 web 方式可能就更不适合了。
Entity Framework Core
基础安装和配置
这部分基本与上一篇的前半部分内容一致,为了保证单篇文章的独立性。把这部分内容完全 copy 过来🙄🙄🙄。
旧的WCF项目,数据库访问使用的是 Entity Framework + Linq + MySql。需要安装的 Nuget 包:
MySql.Data.EntityFrameworkCoreMysql的EF核心库;Microsoft.EntityFrameworkCore.Proxies《Lazy loading 》 懒加载的插件;Microsoft.EntityFrameworkCore.Design和Microsoft.EntityFrameworkCore.Tools这两个插件,用于生成代码;
另外,还需要下载安装 mysql-connector-net-8.0.21.msi 来访问数据库。其中有一个 Scaffold-DbContext 的bug 99419 TINYINT(1) 转化为 byte,而不是预期的 bool。这个问题将会在 8.0.22 版本中修复,目前只能手动修改。
EF当然是 Database First 了,生成EF代码需要在Package Manager Console用到 Scaffold-DbContext 命令,有三点需要注意:
Start up启始项目一定要是引用它的项目,并且编译成功的;Default project生成后,代码存放的项目;- 如果生成失败,提示:“Your startup project 'XXXX' doesn't reference Microsoft.EntityFrameworkCore.Design. This package is required for the Entity Framework Core Tools to work. Ensure your startup project is correct, install the package, and try again.”。编辑项目文件 csproj 移除
<PrivateAssets>All</PrivateAssets>从 "Microsoft.EntityFrameworkCore.Design"和"Microsoft.EntityFrameworkCore.Tools"中;

我的命令: Scaffold-DbContext -Connection "server=10.50.40.50;port=3306;user=myuser;password=123456;database=dbname" -Provider MySql.Data.EntityFrameworkCore -OutputDir "EFModel" -ContextDir "Context" -Project "DataAccess" -Context "BaseEntities" -UseDatabaseNames -Force
其他建议:
- Library类库最好是
Net Standard方便移植; - 新建一个类来继承
BaseEntities,覆盖OnConfiguring方法,可配置的数据库连接字符串;
public class Entities : BaseEntities
{
    private static string _lstDBString;

    public static void SetDefaultDBString(string _dbString)
    {
        if (string.IsNullOrEmpty(_lstDBString))
        {
            _lstDBString = _dbString;
        }
    }

    protected override void OnConfiguring(DbContextOptionsBuilder optionsBuilder)
    {
        if (!optionsBuilder.IsConfigured)
        {
            optionsBuilder.UseLazyLoadingProxies().UseMySQL(_lstDBString);
        }
    }
}
- 最好采用 asp.net core 的框架注入;鉴于项目的原因,假如强行采用的话,改动比较大,只好放弃;
public void ConfigureServices(IServiceCollection services)
{
    string _dbString = Configuration.GetConnectionString("MyDatabase");
    services.AddDbContext<DataAccess.Context.Entities>(
        options => options.UseLazyLoadingProxies().UseMySQL(_dbString));
    services.AddGrpc();
}
- 数据库链接字符串有多种存放的方式,有更加安全的方式《ASP.NET Core 中的开发中安全存储应用机密》;而我采用简单方式,存放在
appsettings.json;
{
    "ConnectionStrings": {
        "MyDatabase": "server=127.0.0.1;port=3306;user=myuser;password=123456;database=dbname"
    },
    "log4net": "log4net.config",
    "Logging": {
        "LogLevel": {
            "Default": "Information",
            "Microsoft": "Warning",
            "Microsoft.Hosting.Lifetime": "Information"
        }
    },
    "AllowedHosts": "*"
}
EF6 to EF Core 3.1
从 Entity Framework 6 迁移到 Entity Framework Core 3.1 的调整:
-
提示错误:
“Set operations over different store types are currently unsupported”。Union 的使用改变,需要添加AsEnumerable(),在 EF5.0 会修复这个问题 issues;AsEnumerable()操作的是 将 Linq to Sql 切换为 Linq to Objects 可以支持 L2O 的所有操作;var query = (from a in context.km_folder select new FolderFileModel() { Id = a.id, Name = a.folder_name }).AsEnumerable(). Union(from a in context.km_fileinfo select new FolderFileModel() { Id = a.id, Name = a.file_name }).AsEnumerable(); // Linq to Sql 切换为 Linq to Objects , 可以执行 外部方法 var query2 = context.Observations.Select(o => o.Id).AsEnumerable().Select(x => MySuperSmartMethod(x)); -
直接执行 sql 语句的方式发生改变, sql查询结果 与 model 里面的字段要一一对应,如果不需要的字段可以添加
[NotMapped]。// EF 6 context.Database.SqlQuery<FolderFileModel>(sql, techArgs); // EF core /// <summary> /// 为了兼容执行sql的方法,参考写法 /// https://stackoverflow.com/a/50452479/6667125 /// </summary> public partial class BaseEntities : DbContext { public virtual DbSet<FolderFileModel> FolderFileModels { get; set; } partial void OnModelCreatingPartial(ModelBuilder modelBuilder) { modelBuilder.Entity<FolderFileModel>().HasNoKey(); } } public class FolderFileModel { public long? Id { get; set; } public string Name { get; set; } [NotMapped] public bool IsSelected { get; set; } } // 执行方法 context.FolderFileModels.FromSqlRaw("SQL SCRIPT", techArgs).ToList();
其他问题
出现问题:指定的架构无效。错误: CLR 类型到 EDM 类型的映射不明确,因为多个 CLR 类型与 EDM 类型“user”匹配。
DbContext 的 MetadataWorkSpace 一旦生成会缓存起来。也就是说,在同一个应用程序域里面,一旦用dbcontext操作过数据库,它会自动读取类所在 assembly 里面的所有类,并尝试匹配数据库模型,然后将匹配结果保存起来(保存到上面的MetaOCSpace中)。当下次操作数据库时,返回数据对应类类所在其它assembly里面的类与当前已匹配数据库模型发生冲突时,便会报错。(这段话是网上抄的)
{{< notice note "在ASP.NET MVC5高级编程(第5版)中第70页作者写到" >}}
实体框架的另一种(默认的)策略是延迟加载策略。使用延迟建在策略,EF在LINQ查询中只加载主要对象(专辑)的数据,而不填充Genre和Artist属性。
var albums=db.Albums;
延迟加载根据需要来加载相关数据,也就是说,只有当Album的Genre或Artist需要属性时,EF才会公国向数据库发送一个个额外的查询来加载这些数据。延迟加载策略会强制框架未列表中每一个专辑向数据库发送一个额外的查询。
{{< /notice >}}
我的理解是,懒加载通过反射来查找实体对象,而该程序集中,存在多个同名的类型,即使改类型在不同命名空间下也会报错。只要将相同的类型名称,改为不一样即可。
服务端 asp.net core web api
这部分可是水还是有点深了。由于最近几年主要以 WPF 桌面软件开发为主,很少了解 asp.net core 。这次算是恶补了一下,下面是个人总结,一切以官方文档为准。
启动类 StartUp
启动类 StartUp.cs ,在这里面主要是注册服务(Swagger、mvc等),注册中间件(身份认证、全局异常捕获等),以及不同环境的切换(Development、Production)。下面是我的 StartUp 类,有几点经验总结:
- 初始化读取全局配置参数,比如
log4net.config,连接字符串等; - web api 只需要添加
services.AddControllers();,而不是 AddMvc(); - Swagger 只在开发环境下启用,而生产环境无效,《在 ASP.NET Core 中使用多个环境》 多环境开发测试,真的太好用了,强烈推荐使用;
- 在根路径下增加返回内容
Hello Asp.Net Core WebApi 3.1!,为了方便测试是否运行成功。
public void ConfigureServices(IServiceCollection services)
{
    InitConfig();
    services.AddControllers();
    services.AddSwaggerDocument(SwaggerDocumentConfig); // Register the Swagger services
}

private void InitConfig()
{
    Entities.SetDefaultDBString(Configuration.GetConnectionString("MyDatabase"));
    Common.LogMaker.InitLog4NetConfig(Configuration.GetSection("log4net").Value);
    Common.WebApiLogger.Singleton.LogMaker.LogInfo("Start WebApi!");
}

private void SwaggerDocumentConfig(NSwag.Generation.AspNetCore.AspNetCoreOpenApiDocumentGeneratorSettings config)
{
    config.PostProcess = document =>
    {
        document.Info.Version = typeof(Startup).Assembly.GetName().Version.ToString();
        document.Info.Title = "Test Web Api";
        document.Info.Description = "仅供测试和发开使用。";
        document.Info.Contact = new NSwag.OpenApiContact
        {
            Name = "long",
            Email = "long@test.com"
        };
    };
}


public void Configure(IApplicationBuilder app, IWebHostEnvironment env)
{
    if (env.IsDevelopment())
    {
        app.UseDeveloperExceptionPage();

        // Register the Swagger generator and the Swagger UI middlewares
        app.UseOpenApi();
        app.UseSwaggerUi3();
    }

    app.UseCustomExceptionMiddleware(); // 全局异常中间件
    app.UseRouting();
    app.UseAuthorization();
    app.UseEndpoints(endpoints =>
    {
        endpoints.MapGet("/", async context =>
        {
            await context.Response.WriteAsync("Hello Asp.Net Core WebApi 3.1!");
        });

        endpoints.MapControllers();
    });
}
路由 和 Controller
真心的觉得 asp.net core 的路由设计,真的是太棒了!而我只用到了其中很小的一部分《REST Api 的属性路由》。其中有个注意点,全局路由与属性路由会有冲突,需要特别注意。
为了方便管理路由,灵活使用,以及后期版本的维护,创建一个路由模板和 Controller基类,所有 Controller 都继承自 MyControllerBase:
public class MyV1ApiRouteAttribute : Attribute, IRouteTemplateProvider
{
    public string Template => "api/v1/[controller]/[action]";
    public int? Order => 0;
    public string Name { get; set; }
}

[ApiController]
[MyV1ApiRoute]
[Produces(MediaTypeNames.Application.Json)]
public class MyControllerBase : ControllerBase
{
}
Nswag
Nswag 和 Swashbuckle 是微软官方推荐的 Swagger 工具(官方 swagger 在线试用😆)。我选择 Nswag 的主要原因是,它提供的工具,根据 API 生成 C# 客户端代码,其实到最后我也没有使用这个功能。 《NSwag 和 ASP.NET Core 入门》。
Nswag 使用起来也非常简单,参考我的 启动类 StartUp 中的写法。如果想要把代码中的注释也体现在 Swagger 文档中,需要执行一些额外的操作。
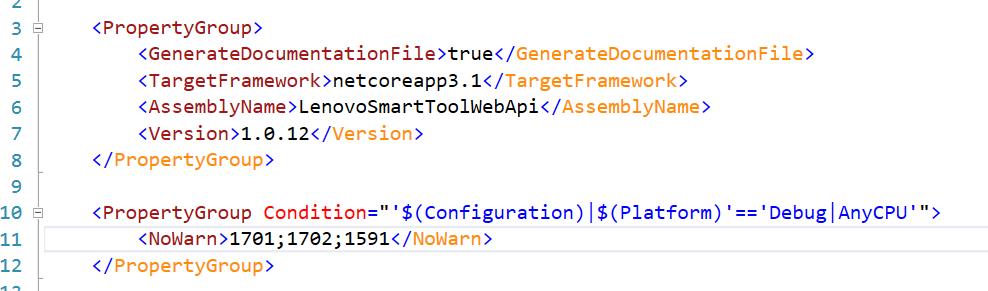
在 csproj 文件中增加 <GenerateDocumentationFile>true</GenerateDocumentationFile>,另外,最好在 /Project/PropertyGroup/NoWarn 中增加 1591,否则你会得到一大堆的 warning : # CS1591: Missing XML comment for publicly visible type or member. 原因是项目中存在没有注释的方法,属性或类。
注:用 swaggerUI 来测试的话,可能会出现两个问题:
- 如果用 nginx 转发的话,会需要 跨域 CORS 的支持;
- 实际使用本地网络发送过去的,比如,在 10.40.50.237 上面搭建的 webapi,而 swaggerUI 发送地址
http://localhost:5000/api/xxx。
上传文件
这里的方法只适合小文件,如果需要大文件上传,需要用到 steam ,多文件上传参数改为 List<IFormFile> 即可。 DisableRequestSizeLimit 取消上传限制。
[HttpPost, DisableRequestSizeLimit]
public bool SendStream(IFormFile _file)
{
    var _newFileName = Path.Combine(UploadFileManagementBLL.Singleton.StoragePath, _file.FileName);
    using (FileStream fs = System.IO.File.Create(_newFileName))
    {
        _file.CopyTo(fs);
        fs.Flush();
    }

    return true;
}
全局异常捕获
用到自定义中间件,而 asp.net core 提供的 UseExceptionHandler 《Handle errors in ASP.NET Core》 我觉得不太好用。
日志唯一ID: TraceIdentifier,方便日后跟踪日志; UseCustomExceptionMiddleware 在 startup.cs 中一定要放在第一位,中间件的顺序是有非常重要的影响的 《中间件顺序》。

public class CustomExceptionMiddleware
{
    private readonly RequestDelegate _next;

    public CustomExceptionMiddleware(RequestDelegate next)
    {
        _next = next;
    }

    public async Task Invoke(HttpContext context)
    {
        try
        {
            await _next(context);
        }
        catch (Exception ex)
        {
            await HandleExceptionAsync(context, ex);
        }
    }

    private Task HandleExceptionAsync(HttpContext context, Exception ex)
    {
        Common.WebApiLogger.Singleton.LogMaker.LogInfo($"Unhandled exception UID:[{context.TraceIdentifier}] Message:[{ex}]");

        string _retString = $"Error! Please contact the administrator.ErrorId:[{context.TraceIdentifier}] Exception:[{ex.Message}].";
        context.Response.StatusCode = (int)System.Net.HttpStatusCode.InternalServerError;
        return context.Response.WriteAsync(_retString);
    }
}

public static class CustomExceptionMiddlewareExtensions
{
    public static IApplicationBuilder UseCustomExceptionMiddleware(this IApplicationBuilder builder)
    {
        return builder.UseMiddleware<CustomExceptionMiddleware>();
    }
}
客户端 WebApiClient
在网上寻找有没有现成的 RESTful 的 C# 工具,发现了WebApiClient,看了一下样例,确实非常简单,非常省事儿,只需要写个简单的 Interface 接口类,就可以了,关键是它还支持各种奇奇怪怪的 HTTP 接口。
PS: 最开始读 README.md 时候,总是一脸懵逼,一直把它当成 server 端的工具😓。直到开始写客户端的时候,才真正看懂了他的文档。
WebApiClient.Tool
Swagger 是一个与语言无关的规范,用于描述 REST API。既然 Swagger 是一种规范,那么极有可能存在,根据 Swagger.json 生成代码的工具。想着 WebApiClient 开发者是不是也已经提供了工具,果然不出所料,WebApiClient.Tools
只需运行一行命令,就可以根据 Swagger.json 直接生成客户端的实体类,接口,甚至包括注释,简直爽的不要不要的,完美的避开了手写代码的过程。
我的命令: WebApiClient.Tools.Swagger.exe --swagger=http://10.50.40.237:5000/swagger/v1/swagger.json --namespace=MyWebApiProxy
WebApiClient.JIT
由于还有一大部分的 win7 桌面软件用户,而他们大概率不会安装 net core ,所以只能选择 net framework 的版本 WebApiClient.JIT。使用起来也相当方便,只需要在启动的时候初始化一下webapi地址,然后在需要的时候调用即可。
WebApiClient 提供的是一个异步的接口,由于旧项目升级,避免大幅改动,就没有使用异步的功能。
public static void InitialWebApiConfig(string _baseUrl)
{
    HttpApi.Register<IUserManagementApi>().ConfigureHttpApiConfig(c =>
    {
        c.HttpHost = new Uri(_baseUrl);
        c.FormatOptions.DateTimeFormat = DateTimeFormats.ISO8601_WithoutMillisecond;
    });
}

public void Todo()
{
    using (var client = HttpApi.Resolve<IUserManagementApi>())
    {
        var _req = new LoginRequestV2();
        _response = client.UserLoginExAsync(_req).InvokeAsync().Result;
    }
}
部署 Ubuntu + Nginx
项目的服务端,对操作系统没有特别要求,所以直接选择最新的 Ubuntu 20.04.1 LTS 。吸取了 gRPC 部署的一些经验,这次只部署 http 服务,额外增加了 nginx 反向代理,只是因为在官网上看到了《使用 Nginx 在 Linux 上托管 ASP.NET Core》😜。
Kestrel 是 ASP.NET Core 项目模板指定的默认 Web 服务器,所以一般情况下,ASP.NET Core是不需要额外的容器的。《ASP.NET Core 中的 Web 服务器实现》。下面是我的具体实现操作:
-
根据文档《在 Linux 上安装 .NET Core》 和 《安装 Nginx》 指引,安装
aspnetcore-runtime-3.1和nginx; -
配置 Nginx ,这部分我用的比较简单,只用到转发功能,未来可能在这一层增加 SSL ;另外
try_files $uri $uri/ =404这一句需要注释掉才行> sudo nano /etc/nginx/sites-available/default server { listen 80 default_server; listen [::]:80 default_server; root /var/www/html; index index.html index.htm index.nginx-debian.html; server_name _; location / { # First attempt to serve request as file, then # as directory, then fall back to displaying a 404. # try_files $uri $uri/ =404; proxy_pass http://localhost:5000; } } > sudo nginx -t # 验证配置文件的语法 > sudo nginx -s reload -
创建 Linux 的 web api 的服务文件,并启动。我的示例,
--urls这个是非常实用的参数,可多端口;重点注意ASPNETCORE_ENVIRONMENT在配置是生产环境,还是开发环境;> sudo nano /etc/systemd/system/kestrel-mywebapi.service [Unit] Description=mywebapi App running on Ubuntu [Service] WorkingDirectory=/home/user/publish ExecStart=/usr/bin/dotnet /home/user/publish/MyWebApi.dll --urls http://localhost:5000 Restart=always # Restart service after 10 seconds if the dotnet service crashes: RestartSec=10 KillSignal=SIGINT SyslogIdentifier=dotnet-example User=user # Production Development Environment=ASPNETCORE_ENVIRONMENT=Development Environment=DOTNET_PRINT_TELEMETRY_MESSAGE=false [Install] WantedBy=multi-user.target > sudo systemctl enable kestrel-mywebapi.service > sudo systemctl restart kestrel-mywebapi.service > sudo systemctl status kestrel-mywebapi.service -
开启防火墙端口,Ubuntu 是默认关闭22端口。安全起见,避免被频繁扫描,建议把 ssh 默认端口 22 改为其他不常见的端口号。
sudo netstat -aptn
sudo apt-get install ufw
sudo ufw allow 22/tcp
sudo ufw allow 80/tcp

sudo ufw enable
sudo ufw status
浏览器测试 http://10.50.40.237,返回预期的Hello Asp.Net Core WebApi 3.1!,完美😁。还有一个小坑就是 https 还没有配置。
自动化脚本
在开发阶段,需要经常得编译,打包,上传。虽然 VS2019 具有直接发布到 FTP 的功能,不过我没有使用。一方面,该功能从来没用过,另一方面,还是想自己写个更加灵活的脚本。
目前只实现了 编译,打包,上传的功能,后续再增加 ssh 登录,解压,重启 asp.net 。
echo only win10

cd D:\Projects\lst\01-MyWebApi\MyWebApi
rem 已注释:dotnet publish --output bin/publish/ --configuration Release --runtime linux-x64 --framework netcoreapp3.1 --self-contained false
dotnet publish -p:PublishProfileFullPath=/Properties/PublishProfiles/FolderProfile.pubxml --output bin/publish/

cd bin
tar.exe -a -c -f publish.zip publish

"C:\Program Files\PuTTY\psftp.exe"

open 10.50.40.237
Welcome123
put "D:\Projects\lst\01-LstWebApi\LenovoSmartToolWebApi\bin\publish.zip"
exit

rem 已注释:"C:\Program Files\PuTTY\putty.exe" user@10.40.50.237 22 -pw password

pause
另外,用一个 WinForm 的测试小程序,尝试了 self-contained = true 这种发布方式,不需要客户端安装 net core 就能运行,发现编译后从 1M+ 大幅增加到 150M+ ,妥妥的吓坏了。即使使用了 PublishTrimmed=true 《剪裁独立部署和可执行文件》,大小也有 100M+,果断放弃。
其他的改动
log4net
log4net 由 1.2.13.0 升级到 2.0.8后,初始化配置文件方法新增一个参数ILoggerRepository。
public static void InitLog4NetConfig(string file)
{
    var _rep = LogManager.GetRepository(System.Reflection.Assembly.GetCallingAssembly());
    log4net.Config.XmlConfigurator.Configure(_rep, new System.IO.FileInfo(file));
}
部署到 Ubuntu 后,发现 log4net 报错。需要把 log4net.Appender.ColoredConsoleAppender 替换为 log4net.Appender.ManagedColoredConsoleAppender。是由于不同的 Appender 支持的 Framework 不同, ColoredConsoleAppender 支持 NET Framework 1.0~4.0 , ManagedColoredConsoleAppender 支持 NET Framework 2.0+ 。详见:《Apache log4net™ Supported Frameworks》
Framework 4.0 的 md5 方法废弃
MD5 摘要也出现问题,需要更改。原因是 HashPasswordForStoringInConfigFile 在 net core 中已经不可用了,该方法在 framework 4.5 中也提示为废弃的方法。修改为下面新的 MD5 方法即可。
public static string GetOldMD5(string str)
{
    string result = System.Web.Security.FormsAuthentication.HashPasswordForStoringInConfigFile(str, "MD5").ToLower();
    return result;
}

public static string GetNewMD5(string str)
{
    using (MD5 md5 = MD5.Create())
    {
        byte[] retVal = md5.ComputeHash(Encoding.UTF8.GetBytes(str));
        StringBuilder _sb = new StringBuilder();
        for (int i = 0; i < retVal.Length; i++)
        {
            _sb.Append(retVal[i].ToString("x2"));
        }

        return _sb.ToString();
    }
}
DateTimeOffset 和 DateTime
以前从来没有考虑过 UTC 时间,这次深深的上了一课, WebApi 中所有传递的时间全部是 UTC 时间。 DateTime.MinValue 转化为 UTC 时间后,可能会出现小于 0001\01\01 00:00:00的时间。需要额外处理一下。
public RequestPartialContent(long _userId, DateTime _newDataTime)
{
    Uid = _userId;

    // 转化为 utc 时间后,可能会小于 MinValue
    if (_newDataTime.ToUniversalTime() <= DateTimeOffset.MinValue.UtcDateTime)
    {
        StartDateVersion = DateTimeOffset.MinValue;
    }
    else
    {
        StartDateVersion = new DateTimeOffset(_newDataTime);
    }
}
总结
目前,只迁移了一部分的 WCF 接口过来,等待部署到生产环境,可以稳定运行后,再将剩余部分全部迁移过来。这次的尝试比较成功:
- 一是满足了基本需求,较少改动老旧代码;
- 二是大部分代码由工具生成,比如 API 文档,接口的实体类;
- 三是很多常用功能,都有现成的插件来完成。
我只需要修改编辑器的 ERROR 的提示就可以了。感觉没有写什么代码🤣。。。顶多只写了几行粘合代码🤣,一种搭积木的感觉😝。其中 asp.net web api 还有很多的功能没有使用,还需要更加细化到项目中。路漫漫~~
我们生而自由
却被后台种种
无形枷锁束缚
